


You’re a writer and your words are important — but are they enough?
Online, it’s tough to keep readers’ interest. They have lots of distractions at their fingertips, plus reading on their device is tiring. An attention-grabbing image can draw them in.
If you’re writing for your own blog, finding, modifying and using images appropriately is completely up to you.
If you’re a freelance writer producing blog content for your clients, then they may want you to suggest images. Some clients will even ask you to upload your completed post, including images, into WordPress for them.
Best practices for using images in your blog posts
Here are nine best practices for using images in your blog posts, whether for your blog or for your clients’ blog.
1. Always make sure you can legally use an image
When you’re looking for images, it’s very tempting to go straight to Google’s image search, type in what you want and pick an option.
Don’t do this. The images you find are very likely protected by copyright. Using them can land you — or your client — with a whole range of problems. At best, you might get a polite email asking you to remove the image. At worst, you might end up facing a hefty fine: in a few cases, images have been deliberately used to lure unwitting victims.
The best places to find images that you can legally use on your blog, or a client’s blog, are:
- Sites that explicitly offer free images. Pixabay and Pexels are great sources of these: there are some other recommendations in this list of places to find free stock images for your blog.
- Stock photography sites like iStock and Shutterstock, where you pay for images.
2. Come up with several different image options
When you’re searching for an image to use in a blog post, it’s tempting to simply pick the first one that you think will complement your work well.
Sometimes, looking a little longer can give you a much better range of images to choose from. Plus, if you’re using popular stock photography sites, digging a bit deeper than the first handful of images is likely to give you something more unique.
If you’re finding images for a client to approve, they may well appreciate you suggesting several options to choose from.
3. Use images that represent your audience and brand
Some stock photos can seem a little “cheesy” or overused and it’s important to keep searching to find an image that’s a good fit for your audience and personal brand.
For instance, perhaps you’ve written a blog post about how setbacks can help you grow and go further. You could illustrate this with a photo of a seedling growing… but that might not resonate with your audience of sporty college students. Maybe a picture of a race track would work better instead.
You may also want to keep in mind the color palette of your blog (or your clients’ blog) when you’re choosing images. Perhaps you want to use images with lots of bright primary colors, or maybe soft, pastel shades would suit your site better.
4. Crop and edit images to suit your piece
Sometimes, you might find a great image that needs a few adjustments to work. If the image is landscape and you need it to be portrait, you might be able to crop it at the top and bottom to make it work. If the image is too dark or light, you could adjust the brightness and contrast.
You don’t need to have expensive graphics editing software to perform basic image editing tasks. Free tools like Paint.NET can work just fine for simple edits.
Note: Depending on where you sourced your image, you might be able to use it freely but not edit or modify it in any way. Check the site’s terms and conditions if you’re unsure.
5. Resize images to the correct width for your blog
Whether you’re adding images to posts for your own blog or posts for a client’s blog, you want those images to be the right width before you upload them. Otherwise, they’ll need to be resized by the blogging software, potentially making them look fuzzy or take longer to load.
It’s a good practice to have a standard width for all images on your blog. This should be no more than the width of the post content area. For many blogs, somewhere from 500px-800px works well.
If you have a lot of images to resize, you can do them all at once using an online tool such as Bulk Resize Photos.
6. Compress images before uploading them
Each image in your blog post takes time to load. If you have several images that have a large file size, your website will be noticeably slower.
Readers will be impatient with slow websites and may leave before your content loads up on their device. Plus, search engines like Google are increasingly favoring fast websites, ranking them more highly in search results.
This is why it’s so important to compress your images before uploading them. Your image will stay the same size and should look the same after compression, but its file size will be smaller.
The easiest way to compress images is to use online tools like TinyPNG and Compress JPEG.
Tip: Use the .jpg format for photos. Use .png for images with only a few colors, text or a transparent background: this includes most screenshots and logos.
7. Name your image files using keywords
Let’s say you’re writing a blog post about libraries and their importance in local communities, titled “Why Libraries Matter And How You Can Protect Your Local Library.”
When you download a typical image, it might be named something like this:
books-1617327_640.jpg
That file name doesn’t include much useful information. Before uploading the image to your blog, you should rename it using useful keywords:
why-libraries-matter.jpg
Search engines can read image file names, so using keywords here can give your SEO (search engine optimization) a slight boost.
8. Add alt text for your images
All images on your website should ideally have alt text (“alternative text”). This can be read by search engines, but more importantly, it can be read by screen readers. These are used by people who are blind or partially sighted.
Alt text makes your post more accessible, particularly if the images are important to the meaning and you write good, descriptive alt text.
For instance, here’s an image of library books from Pixabay:

Using the alt text “books” wouldn’t be very helpful. Instead, something like “Library books displayed on shelves” would work better.
Note: Alt text isn’t the same as title text. The title text for an image will be displayed when the user runs their cursor over the image. The alt text won’t be seen by regular users, only by search engines and users with a screen reader. It usually makes sense to use the same phrase or sentence for both the alt text and the title text. For help adding these, check out this post on image alt text vs image title.
9. Consider using arrows or other elements on screenshots
If you’re demonstrating a technique using screenshots, it’s helpful to add arrows or boxes to point out particular parts of the image. These are sometimes called “callouts” or “markup.”
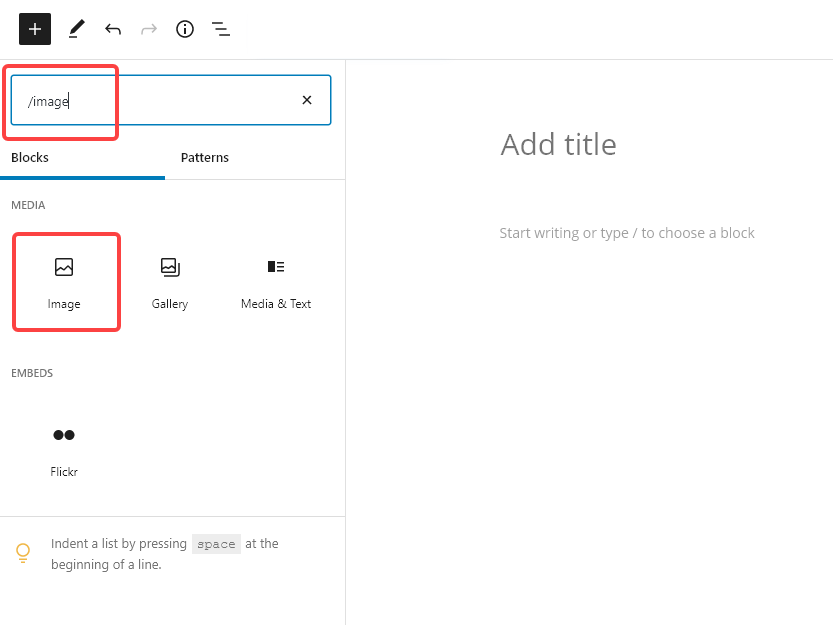
For instance, here’s a screenshot that shows you how to add an ‘Image’ block in WordPress’s block editor. The red boxes show you where to type in the search box and what to click on:
If you’ve got a screenshot with multiple different elements, using arrows or boxes can help readers quickly take in the relevant parts.
You may well feel, as a writer, that words are your thing. But using images in your content isn’t hard — and the right images could make a real difference to how engaging and useful your posts are.