Tag: time management

  • Freshbooks Hacks: 6 Ways to Get More Out of This Invoicing Tool

    Freshbooks Hacks: 6 Ways to Get More Out of This Invoicing Tool

    Editor’s Note: Since this post was originally published back in 2015, FreshBooks has rolled out newer versions. This post has been updated in 2024 to reflect perks, tips and tricks available for the latest FreshBooks platform — which is what you’ll get if you sign up for a free trial today.

    If you were paid for every hour you spend working on your freelance writing business, you’d be rich.

    But when you work for yourself, there’s a lot you need to do to keep your business running smoothly. Administrative tasks like invoicing, keeping track of payments, client management and bookkeeping can eat up loads of time — and you’re not paid to do them.

    The more efficiently you can manage these tasks, the more time you can spend on paid work. And if you can automate a few things, even better.

    Enter FreshBooks, the freelance writer’s time-saving and money-saving dream.

    You may already be familiar with this online invoicing software that makes it easy to send invoices and receive payments. But did you know FreshBooks can also save you a boatload in invoicing fees? And that it can help you stay on top of your business expenses? Or that there’s a time-tracking feature?

    Read on to learn how you can use FreshBooks to more efficiently manage your business and free up time to focus on paid freelance writing work.

    1. Track your time

    freshbooks for writers

    Whether you have clients on retainer, are paid a flat rate per project or bill hourly, it’s always a good idea to keep track of how much time you spend on each client.

    Why? Because you could be logging more time than you thought. And when you know exactly how long you need to complete a particular task, you can better evaluate the projects you take on and rates you charge.

    For example, you may think you need two hours to write a blog post, but by tracking your time you discover it takes three. Say you’re being paid $50 for the post. That means you’re making $16.66 an hour, not the $25 you thought — a big difference.

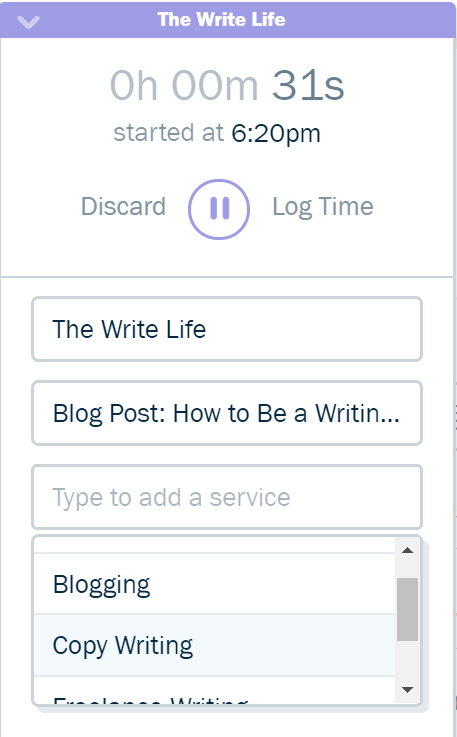
    Tracking your time when you need to be doing actual work may seem like a drag, but the FreshBooks app for iPhone, iPad and Android makes it super easy.  Just select your client and project, then start the timer — or pause it when you need a break — and you’ll be well on your way to time tracking bliss.

    FreshBooks is also compatible with several desktop widgets such as ChronoMate for Mac OS-X and Toggl, so you can track your time even when you’re offline.

    FreshBooks also makes it easy to note which of your services you’re using for any given project. For instance, perhaps you’re a freelance writer who offers blogging, copywriting, and SEO services. Noting which of these skills you’re utilizing on each timer you set can help you discover which of your services is most lucrative — and thus, which aspects of your business to invest more time and energy into.

    Pro tip: To set your freelance writing rates, it’s helpful to know exactly how much time you spend on every single aspect of your business. To get a handle on how much time you spend doing stuff that doesn’t bring in cash, create a new client: yourself. Then track any time you spend on marketing, business development or administrative tasks.

    Having a full 360-degree view of where your time goes could be eye-opening. You may realize it’s time to raise your rates because you need to account for that unpaid time you’re dedicating to your business each week. (Need a little more encouragement? Check out FreshBooks’ ebook on how to charge what you’re really worth.)

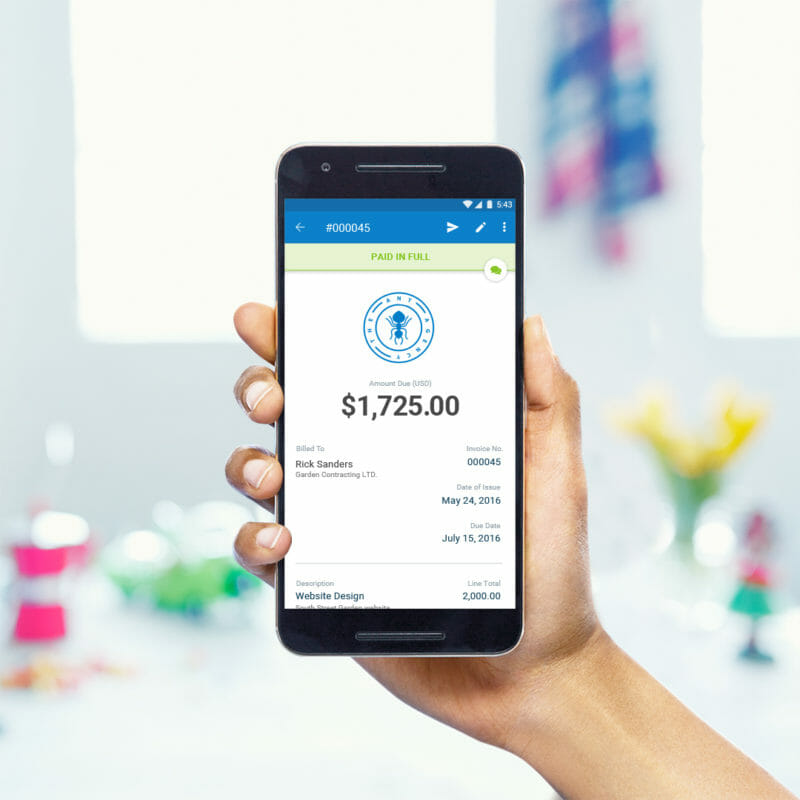
    2. Increase your chances of timely payment

    Every freelance writer fears the unpaid invoice. To help avoid this uncomfortable situation, each invoice should remind clients of the payment terms you agreed to in your contract. (If you don’t have a freelance writing contract, it’s a good idea to start using one.)

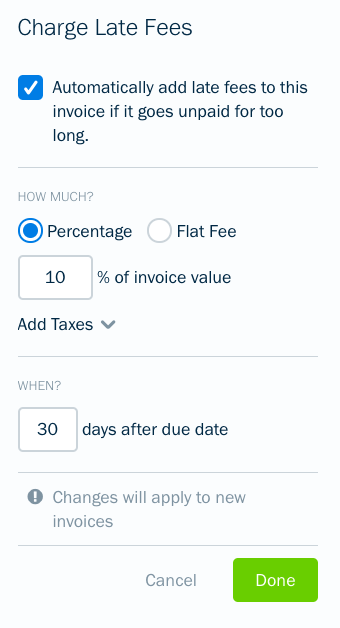
    FreshBooks has done the heavy lifting here and analyzed what language for payment terms works best. They found that being polite, telling clients exactly how many days they have to pay and adding interest for late payments increase the likelihood that you’ll be paid on time.

    freshbooks for writers

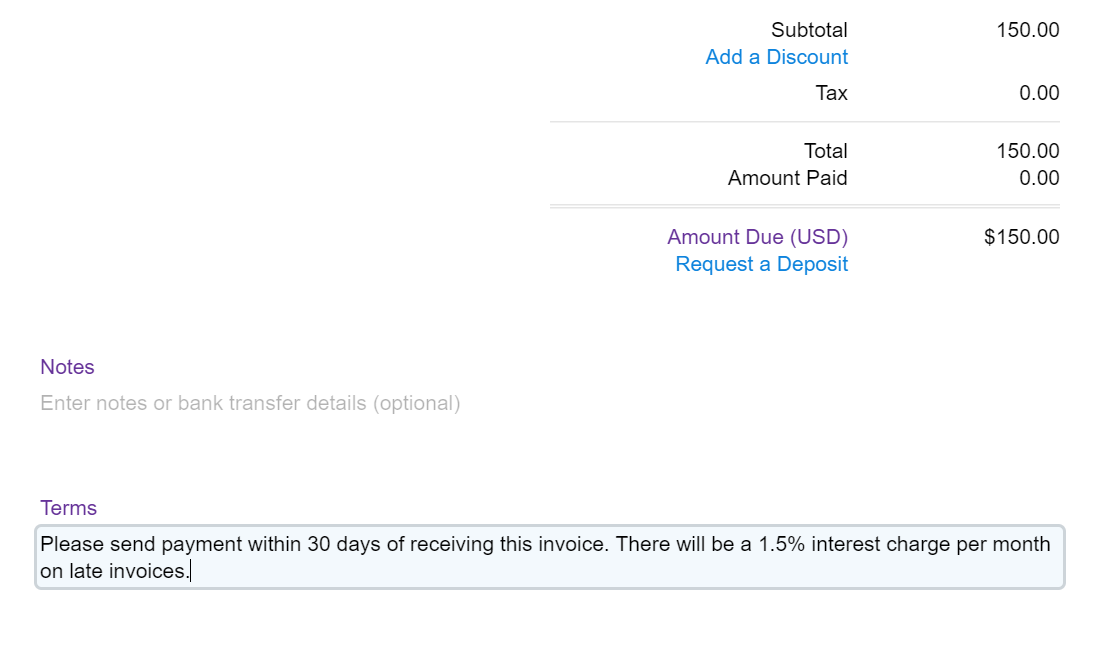
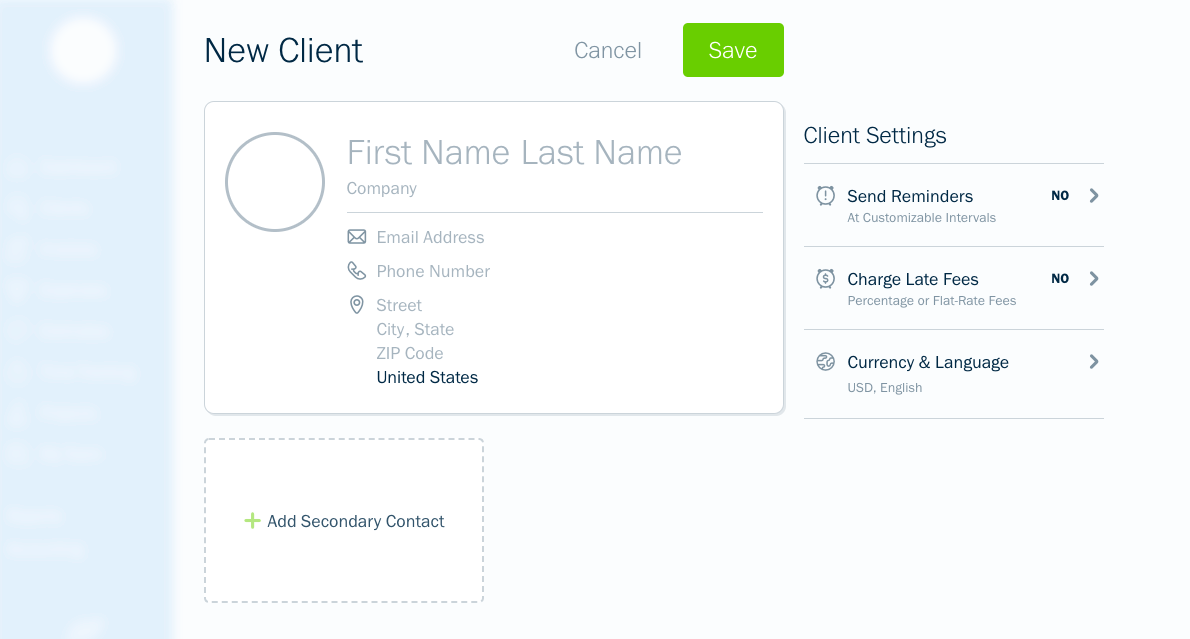
    Pro tip: You may not have the same payment terms for all clients. You can edit the default language on each invoice to ensure the terms you and a particular client have agreed upon are correct.

    3. Manage your incoming payments

    “I love keeping tabs on all my clients to make sure they pay on time,” said no freelance writer ever.

    When you’ve got handful of invoices out for payment, it can be hard to keep track of when each payment are due — and which clients may have missed their deadlines to pay.

    With FreshBooks, it’s easy to keep track of who owes how much and when they owe it — all you have to do is click on “Accounts Aging” at the bottom of your home screen to generate a full report.

    Pro tip: You can set up your FreshBooks account to automatically send a reminder to clients who have missed their payment deadline. Set up a late payment notification, personalize your message and clients will receive a gentle nudge if they accidentally forget to pay.

    How freelance writers can make the best use of Freshbooks to streamline invoicing — and ultimately make more money!

    4. Calculate expenses and tax deductions

    Come tax time, you better believe you can deduct every $5.50 almond milk latte (well, technically half of each one) you sipped while doing client work from your favorite coffee shop. Use FreshBooks to track your business expenses throughout the year and even add photos of receipts in case the IRS wants them later.

    While you’ll have to be diligent about logging and categorizing each expense throughout the year, this will come in handy when you need it most. FreshBooks will calculate the exact amount you’ve spent in each category, making it a breeze to fill out those pesky tax forms.

    Pro tip: Do you need to submit expenses to a client? No problem: FreshBooks makes it simple to mark an expense as billable, so you can invoice it to your client down the line.

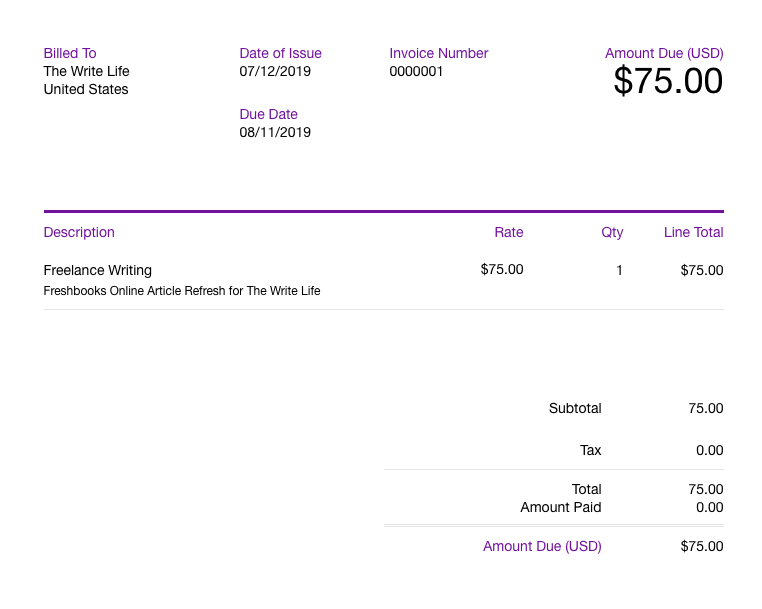
    5. Professionalize and personalize your invoices

    There are a few other small things you can to to customize your invoices and show off to clients how amazingly organized, professional and lovely to work with you are.

    If you’d like your invoices to look a bit more professional, simply drag and drop to add your logo. You can even choose from a variety of preloaded templates, colors and fonts to give your invoices some pizzazz.

    Use the notes section to start building a good relationship with a new client. A short-and-sweet thank-you note never hurts. In fact, FreshBooks claims that including a polite “please” and “thank you” increases the chances of your invoice being paid.

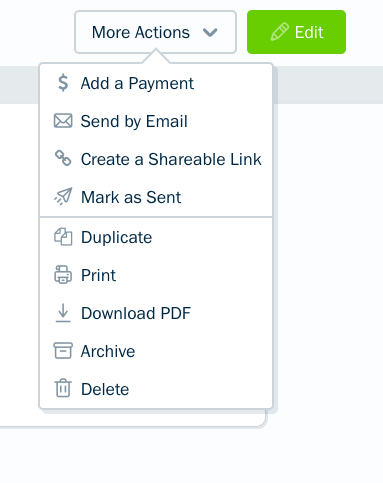
    Have a client who communicates some other way than email? You can choose to export your invoice as a sharable link instead of sending it through the FreshBooks client, which allows you to send it whichever way your client prefers — which might help you get paid in a more timely fashion if you work for someone who doesn’t strive for Inbox Zero.

    6. Pitches, proposals and pricing

    Customisable proposals and pitches give your clients all the details, supported by images and attachments. Scope it out, outline their needs and how you meet them, the click send and win that business.

    With in-app commenting, online approval and eSignatures, Proposals help your clients take action. Align timelines and easily convert Proposals to Invoices to save time billing.

    In progress, viewed, or accepted. You always know the status of a Proposal. Client questions? Respond right in FreshBooks. Need an old Proposal? Track them all in Client Profiles.

    Want to learn more? Try FreshBooks free for 30 days or get 50% off for the first 3 months!

    Do you use FreshBooks to manage your invoices and expenses? Did we miss any of your favorite hacks or strategies?

    This post contains affiliate links. That means if you sign up for FreshBooks through our links, you’re supporting The Write Life — and we thank you for that!
    links

  • The Beginner’s Guide to Freshbooks: How to Create an Invoice

    The Beginner’s Guide to Freshbooks: How to Create an Invoice

    Cha-Ching! You just got your first paid freelance writing assignment. Edits go smoothly, the publication date is set, and there’s just one last thing to do.

    “Shoot me over an invoice and I’ll submit it to accounting,” your editor says.

    That’s when the frantic Googling commences. Because you’ve never created an invoice before. And you’re not sure where to start.

    I’ve been exactly in this position. So I checked the first invoicing software my freelancer friends recommended. Freshbooks made it so easy for me to create my first invoice that I was instantly sold. It’s now my go-to invoicing tool — and it helps me with other business tasks, too.

    Here’s everything you need to know to open a free Freshbook account, create your first invoice and get paid.

    1. Create your Freshbooks account

    Good news: Since you’re new to invoicing and Freshbooks, you need not pay for anything (yet). Freshbooks offers an honest-to-goodness truly free 30-day trial. You don’t even need to put in your credit card.

    So simply head to the Freshbooks homepage and get started by entering your name and email.

    What happens when your free trial ends? You have to choose one of their paid plans. The most affordable Freshbooks plan is called Lite, which gives you a maximum of five clients at $15 per month.

    2. Add your first client

    Adding your first client is the next step. The only required information is the name of the company you’re invoicing and an email address. Your editor might want to receive the invoice, or they may want you to send it straight to their invoicing department instead. So check to make sure you’re dropping in the right email address here.

    You can add other information in this step such as the company’s mailing address. But if you don’t have this info and your client doesn’t require it, then don’t worry. Hit save, and you’re ready for the next step.

    3. Create your invoice

    Once you hit save, you’ll have a few options. Some of these may come in handy later, but for now click the arrow next to the “Create New” button and select “Invoice.” 

    You’ll see that your invoice number and date of issue are pre-filled. You can change these if you like, or just leave them as-is.

    Then you’ll need to enter a few details:

    Item: Add a new line and write the item or service you are billing for. The item name cannot be more than 50 characters long. Then add a description just below the item name with detail about the work you’re invoicing for. For example, it could be a blog post, online article or editing services. If you create more invoices down the line, you can reuse these items or create new ones.

    Rate and hours: If you’re paid hourly, enter your rate and hours in these two columns. If you’ve agreed to a flat fee per project — for example $75 for one blog post — then enter your project total in rate and bill for one hour. If you’re billing for multiple assignments (go you!) then add a line and repeat the above steps.

    Logo: If you have a business logo, insert the file directly into the invoice by dragging and dropping or uploading from your computer. This creates a more polished-looking invoice when the client receives it.

    Time tracking: You can also generate an invoice directly from your billable hours that you have tracked under the “Time Tracking” section. Simply click “Generate Invoice” and select the appropriate hours listed for that client.

    4. Add terms and notes

    You aren’t required to add anything to these terms and notes boxes. But should you? It’s always a good idea to agree on terms with a client beforehand, so this is a great place to add a reminder. You can use the notes box to send along a friendly note to your client to let them know you enjoyed working together and look forward to your next assignment.

    According to Freshbooks, you’ll get paid five percent faster if you add a dash of politeness to your invoice. A simple “Please pay your invoice within 30 days” in your terms and “Thank you for your business!” in the notes can go a long way.

    5. Hit send

    Once you’ve double-checked the details, you’re ready to send! When you click send by email, you’ll receive a pop-up to review the email subject and body your client will see. You can edit both of these to further personalize your invoice.

    If your client doesn’t use email, there is also the option to copy a shareable link for the invoice. This gives you and your client a little flexibility.

    6. Get paid

    Now all you have to do is wait to get paid! There are a few things you can do to ensure payment and remind clients in case they forget to pay.

    • Be sure to set payment terms, and include those at the bottom of your invoice; for example, a 15 percent late fee after 30 days. While editing an invoice, you can set up an automatic late fee of either a percentage or a flat rate if the client does not pay on time.
    • Log into Freshbooks at any time to see if the client has viewed your invoice. If they haven’t, you can easily resend it.
    • Automatically send late payment reminders. Go to edit invoice > send reminders > automatically send payment reminders. You can set up to three reminders that auto-send if your client doesn’t pay within a certain time frame.

    Ready to create your first invoice? Try a trial run first by sending an invoice to yourself. Make a new client (yourself) and follow the above steps. Then you can review your invoice, see what it looks like from the client’s perspective and make sure you’ve got the process down.

    Sounds easy, right? Head on over to Freshbooks to give it a whirl! Happy invoicing!

    The original version of this story was written by Betsy Mikel. We updated the post so it’s more useful for our readers.

    This post contains affiliate links. That means if you purchase through our links, you’re supporting The Write Life — and we thank you for that!

  • Tracking Freelance Earnings: January 2016 Income Report

    Tracking Freelance Earnings: January 2016 Income Report

    How was your first month of 2016? Did you set a freelancing goal? Did you take steps to achieve it? Let’s look at how I did this January, and check in with another freelancer about her freelancing goals.

    First, my January numbers:

    Completed pieces: 64

    Work billed: $5,676

    Earnings received: $4,884.30

    I wrote roughly 57,000 words in January, with an average per-piece earning of $89. My highest earning piece was $1,029, and my lowest-earning piece was $78.

    I would have earned more than $6,000 this month, except one client canceled an assignment. This is the kind of thing that happens once in a while, which means it’s always important to plan more work than you need. When I say I want to earn $5,000 every month, I know I need to plan to earn a little more, just in case something like this happens.

    Checking in on my freelancing goals

    How am I doing on my freelancing goals?

    I’m on target to maintain my $5,000 monthly income. I’m also working towards building new client relationships. However, I fell behind in my goal to work reasonable hours. I spent the first half of January ending my workday — and turning off social media — by 6:30 p.m., but during the second half of the month the hours started creeping up again.

    I’ve heard other people say 2016 already feels busier than 2015, so I’m curious if you feel that way as well. I have a lot of opportunities available to me this year, which means putting in extra hours to make sure I both manage my workload and build the foundation for the work I want to be doing in the second half of 2016.

    However, I have already made changes for February. The biggest change? Telling clients I already have a full workload for the month, and can’t start any new projects until March. Let’s hope I can keep that resolution and keep my workload manageable!

    But enough about me. I also made a goal to turn this column into a collaboration, so today we’re going to look at another freelancer and her 2016 goals.

    Q&A with MaryBeth Matzek of 1BizzyWriter

    MaryBeth Matzek is a freelancer whose work includes journalism, blogging and content marketing. She also owns a quarterly agriculture publication, Midwest Agriculture Almanac. Learn more about Matzek’s work at 1BizzyWriter, or follow her on Twitter at — you guessed it — @1BizzyWriter.

    ND: What is your freelance life like?

    MM: Busy. I feel like I constantly have multiple irons in the fire at all times, but it’s better than the alternative — not having enough work. 2016 marks my 10th year as a freelancer and honestly I wouldn’t have it any other way. I love the flexibility it gives me to help out at my children’s school, with their sports teams and not having to worry or explain why I need time off for doctors’ appointments, illnesses, etc. I write primarily for publications — mostly business and trade focused.

    What would you like to improve about your freelancing career?

    I would like more balance — at times, the work can seep into my family time, which is not what I want. I would like to replace lower-paying clients with ones that pay more so I can earn more and work the same amount (or less).

    What steps are you taking to help you get there? Have you had success so far?

    I have let one client go that was too much work for the money to free up my time to find additional, better-paying work. After doing that, I was able to connect with a trade magazine publisher that provided me with a lot of work. As for finding a balance and being more organized, that’s still a work in progress. I always start out Mondays with good intentions, but by the end of the week, my desk is a complete mess.

    Do you have an income goal for 2016?

    In 2015, I grew my income by nearly $20,000 so I would like to maintain that gain in 2016 and if possible grow it by a few more thousand.

    What steps are you taking to hit that income goal? Have you had success so far?

    We’re only a month into the year so I haven’t had too much time to find new partnerships, but I continue to work on growing the ones I have with clients and publications. I know I need to send out additional letters of inquiry and pitches to publications and websites that I’m interested in writing for and need to build that time into my schedule every week.

    What is the hardest part of freelancing, for you?

    Finding balance between too much work that I can’t breathe and that not having enough work that I panic about never finding work again, which is ridiculous I know since I have several clients I can consistently rely on for work each month. But as I found out in 2015 when two smallish clients cut their budgets and I lost work, I can’t always rely on that.

    What do you feel like you do really well as a freelancer?

    Write compelling, well-written articles on time. Editors also love that I’m easy to work with — want me to find another source or have the story in by Friday? Sure, I can do that. My 11 years of daily newspaper experience provided me with a great skill set that allows me to just do that.

    What advice do you have for other freelancers?

    Don’t give up and always make your deadline. And if you need more time, ask for it and explain why at least one day before the deadline. As an editor on the other side of the table, nothing is worse than when you expect a story and then have it not show up.

    Share your January stories

    Now that you’ve seen my freelancing update and learned how MaryBeth Matzek is planning to structure her goals for 2016, it’s time to share your January stories. How did you do this month? Did you make your income goal? Did you pitch a new client? Did you write something you’d like to share with us?

    Share your January successes and struggles in the comments.

    If you’d like to be part of a future Tracking Freelance Earnings column, email me at dieker.nicole@gmail.com. See you all next month with a new update!

  • How to Use the Pomodoro Technique as a Freelance Writer

    How to Use the Pomodoro Technique as a Freelance Writer

    Have you ever reached the end of your workday, only to feel you didn’t have much to show for it?

    Or do you sometimes find you have a hard time staying focused on your work? Does it seem like you work a lot, but you’re often spinning your wheels, instead of completing your most important tasks?

    I’ve felt the same way. Since I recently took my freelance writing business full-time, I’ve had to figure out a better way to manage my work hours.

    One strategy that’s made a huge difference in my workflow is the Pomodoro Technique. Breaking my work into manageable chunks using this method helps me accomplish more in a day than I thought possible, while keeping me focused and preventing burnout.

    Here’s how I use the Pomodoro Technique to improve my writing productivity — and how you can, too.

    What is the Pomodoro Technique?

    This time-management method was developed by Francesco Cirillo in the late 1980s.

    The idea behind the technique is people can only stay hyper-focused on a task or subject for a finite period of time — generally about 90 minutes. Instead of trying to sit at your desk from 9 to 5 (or whatever hours you currently keep), it makes more sense to break up your day into sections. The technique calls these chunks of time “pomodori,” and each one is known as a “pomodoro.”

    Each pomodoro includes 25 minutes of focused time, followed by a five-minute break. Most sources suggest linking three or four pomodori together (with those five-minute breaks in between sessions), and then taking a longer break of 20 to 30 minutes. Lather, rinse and repeat.

    Set your timer using your phone, a stopwatch or a regular clock, or download one of several dedicated Pomodoro Technique apps and timers. I’ve used and like this free timer, though I’ve had to mute its annoying ticking sound.

    How to get started with Pomodoro

    Before launching into your first pomodoro, list your tasks for the day, with the most important ones at the top. Select your two or three most important tasks (MITs): the ones whose completion would make your day a success, regardless of what else you accomplished.

    I always make sure I spend my morning hours (or pomodori) writing, whether I’m working on client work or my own blog posts. I try to leave email and social media work until later in the day, as challenging as that can sometimes be.

    Here’s a sample schedule for an eight-hour workday, with 12 defined tasks (or pomodori) and a lunch break. Remember, each pomodoro includes 25 minutes of work time and a five-minute break.

    9:00-9:30 Write article

    9:30-10:00 Write article

    10:00-10:30 Write article

    10:30-11:00 Long break

    11:00-11:30 Check email

    11:30-12:00 Blog outreach

    12:00-12:30 Search job boards and pitch new clients

    12:30-1:30 Long break for lunch

    1:30-2:00 Social media promotion

    2:00-2:30 Write article or brainstorm new post ideas

    2:30-3:00 Write article or brainstorm new post ideas

    3:00-3:30 Long break

    3:30-4:00 Check email

    4:00-4:30 Coursework or nonfiction reading

    4:30-5:00 Social media promotion

    Document your accomplishments

    This isn’t an essential part of using this method, but it’s a great way to see how your efficiency and hard work are paying off.

    If you’re using an app or web-based timer, you may be able to track your tasks within its interface. For example, freelancer and entrepreneur Brennan Dunn loves that his app of choice encourages him to write down what he did during each pomodoro.

    Tracking could also be as simple as making a check mark next to each pomodoro on your schedule, or writing a few quick notes in a Word or Google Doc. Either way, looking back on your day and seeing what you achieved can help keep you motivated and productive.

    What to do with your five-minute breaks

    Since many of us spend too much time in front of our computers and not enough time being active, use these five minute breaks to get up, move around and stretch your body. They’re a great time to take a bathroom break, get a cup of water, coffee or tea, or make a quick snack.

    Since I have two toddlers and find it hard to fit exercise into my day, I use many of my five-minute breaks to do this no-equipment-necessary workout. I’ve found exercise helps me recharge before starting my next pomodoro, but you might also want to try meditating, journaling or having a quick conversation with a friend.

    Avoid checking email or social media during your five-minute breaks. Both tasks can become black holes, and it’s easy to slip into a “just five more minutes” mentality when you’re facing an overflowing inbox.

    However, checking your email or Twitter feed means you’re not necessarily taking a break from work (or your computer screen). Instead, use the five minutes to walk away from your work and do something that helps you recharge.

    Shoot for progress, not perfection

    Using the Pomodoro Technique to manage the structure of your day can help you cross more tasks off your list.

    Aim be more productive overall, rather than trying to be perfect. Ending a pomodoro a few minutes early or working a couple of minutes past your timer isn’t the end of the world. Neither is finding that you can only complete one or two pomodoros in a day before having to switch to another strategy to complete your tasks.

    If you’ve found yourself at the end of your day with little to show for it, why not give this method a try?

    Have you tried the Pomodoro Technique? How did it work for you?

  • How to Write a Novel, 15 Minutes at a Time

    How to Write a Novel, 15 Minutes at a Time

    “What do you mean, you wrote this in 15 minutes?”

    The woman seated across from me at a writer’s group was waving my novel around like a flag. I’d just been discussing the 15-Minute Writing Method to the group who’d invited me to speak about my second novel, Dark Circle, and what my writing process was like.

    “Just that. I write in 15-minute chunks, most days of the week. And then,” I waved my own hand toward the book she was holding, “voila!”

    Of course, as I explained, it’s not quite that simple.

    What’s the 15-Minute Writing Method?

    The 15-Minute Writing Method is something I came up with while working on my first novel. I’d tried (and failed) quite a few times to complete a manuscript for a full-length work.

    I would start out all shimmery and starburst, trying to replicate the writing process of famous, bestselling authors who write thousands of words or many hours a day. Hugh Howey, for instance, writes for four to five hours every day. Charles Hamilton, an English author, was said to have written 20 full-length pages each day.

    However, an hour or two into my writing time, the glitter would fade. I’d get bored and set the novel aside. I always intended to pull it back out at some point, but I never did. Instead, weeks or months later, I’d dream up a new idea for a new novel. And then I’d start the process all over again.

    Frustrated with myself after yet another failed attempt, I decided to try something new.

    Writers with short attention spans — or those struggling to fit writing around a full-time job, a family or other commitments  — this is for you.

    Here’s the plan: Write for 15 minutes, most days of the week.

    That’s it?

    While there is obviously a bit more involved, the basic premise is this: break down what can look like a huge, overwhelming task into tiny, bite-sized pieces.

    Look at marathon runners: they don’t begin their training by trying to run 26.2 miles. Instead, they run many shorter distances to build stamina, and slowly increase the mileage as they get stronger. Why would you start writing a book by trying to write the entire book?

    Here are five tips that will help you make the most of the 15-Minute Rule:

    1. Look at writing a novel as simply forming a new habit

    This perspective makes the task so much less intimidating! Have you ever trained yourself to floss your teeth? Eat healthier foods? Stop swearing? These are all habits, just like writing.

    I highly recommend reading The Compound Effect by Darren Hardy, which describes how small, seemingly inconsequential changes add up over time. It’s up to us to decide if these little tweaks are positive or negative in nature.

    Try to work with your natural tendencies, not against them. If you are most creative in the morning, squeeze in your 15 minutes of writing as soon as you wake up or before you leave for your day job. More of a night owl? Make your daily writing a before-bed habit, right after you brush your teeth.

    2. Remember, it’s only 15 minutes

    When I first started exercising as a teenager, I never dreamed I’d be able to run three miles (or even one). I was an overweight kid and adolescent, and the thought of doing really big things athletically was outside of my thought process.

    But I could walk for five minutes, so that’s where I started.

    You can do just about anything for just 15 minutes (or 10, or five), so start there. Think you don’t have even a few minutes to focus on your writing? Try giving up something that you don’t need, like watching TV (even the news), or setting strict limits on social media time.

    3. Set a big goal and break it into pieces

    Set a date to complete your first draft and mark it on your calendar. Make sure it’s reasonable, given that you’ll be writing in shorter chunks rather than marathon sessions. While writing my first novel, Epidemic, I was working full time. I wrote in 15-minute chunks before leaving in the morning, and completed a first draft (ugly, yes, but complete) in approximately five months.

    Next, look at your calendar and work backwards, setting up mini-goals like “get to 15,000 words”  or “complete chapter nine.” Add in some fun rewards for these smaller goals. Nothing says “yay” to me like a bouquet of fresh flowers or some pretty new office supplies.

    4. Avoid editing

    While of course you want to produce a polished, well-edited final draft, there is a time and place for editing — and it’s not while you’re in the process of getting that icky first draft out.

    Minimize the urge to edit by not re-reading what you’ve written. If you need to reorient yourself in the story at the start of a writing session, go back and read the last paragraph or two of yesterday’s work, but don’t allow yourself to look at any more than that.

    5. Don’t beat yourself up

    If you miss a day, or several, it’s ok — just jump right back into your process. Allowing that critical inner voice free rein here does no good and a lot of harm. Start fresh the next day, and keep going. Over time, it will feel strange not to have your 15-minute writing session!

    Let the process of writing your novel be as messy and ugly as it needs to be. But don’t make it harder than it is by setting huge and overwhelming goals for your writing time or word count. Ease yourself into your new habit by working on your manuscript for just 15 minutes a day. You’ll be amazed at what you can accomplish.

    Have you tried breaking your writing sessions into short, daily chunks? How did it work for you?