Ebooks can be life-changing. If you want a steady stream of side income or you’re eager to take the first big step in your career as a writer, writing an ebook is a great place to begin.
Lots of writers (and would-be writers) recognize that, but have yet to get started on their own ebook. Perhaps you’re one of them: you’re not sure where to begin, or you’re worried about how you’ll find the time.
I’ve been writing and publishing ebooks — for myself and for clients – since 2008, and I’ve helped lots of writers get their own ebooks finished. I’m focusing here on nonfiction ebooks, but many of the tips will also work for fiction writers.
These nine tips will help you come up with a great idea, do your research, and get your first draft written.
The biggest mistake new writers make when figuring out how to write an ebook is picking an idea they think is good, without exploring whether there’s actually a market for that topic.
Tip 1: Choose a Topic
Some topics might sound like great possibilities because you know there’s a big market out there. But don’t decide to write a “dieting book” or “self-help book” (or any other type of book) just because you think it will make money. You may find that the market is saturated, and only established big names are currently selling well.
Instead, choose a topic that (a) you already know a lot about and (b) you’ll enjoy writing about. This saves you doing lots of research just to get up to speed, and it substantially increases the chance that you’ll see your ebook through to a final draft.
Tip 2: Identify Your Unique Expertise
If you’re not sure what your specialist topics are, take a look at your magazine subscriptions or the blogs that you visit frequently. These should give you some clues!
Once you’ve settled on a topic, dig deeper into these resources. You’ll probably find certain articles crop up again and again (with a different spin each time); these indicate perennially popular topics, and the core idea they cover could be a great topic for an ebook.
Tip 3: Survey Your Audience
If you’ve got a blog or an email newsletter, then you’re well ahead in the ebook game. You not only have a ready-made audience for your work, you also have a great source of ideas.
Two simple ways to do this:
Come up with three to seven possible ebook titles or topics, and survey your audience to find out which they prefer. SurveyMonkey is great for this or even a Google Form.
Go through comments or emails you’ve received. What questions or problems crop up again and again? Could you write an ebook addressing those?
Tip 4: Allocate Time for Research
Many writers find it’s easy to get stuck at the research stage, gathering more and more articles and resources, thumbing through books again and again, jotting down great quotes, facts and references.
Avoid this by giving yourself a limited amount of time for research. That could mean setting aside, say, two weeks purely for research before you begin writing, or researching for a certain length of time as you come to each new chapter of your ebook.
Tip 5: Read Similar Books
This may sound obvious, but some writers are overly reliant on blog posts and articles, and don’t necessarily turn to other (e)books. Whatever your topic, it’s likely you’ll be able to find some similar books and ebooks. If you can’t, you may have to consider whether it’s too obscure to focus on.
You won’t need to read every word of every book you choose; instead, use the table of contents or index to help you find the parts most relevant to you. These can also help throw up extra ideas on aspects of the topic you might not have considered yet.
Tip 6: Fact Check
If your particular topic area has a few oft-quoted facts or statistics, it can be tempting to repeat these without double-checking them. Be careful, though: other authors won’t necessarily have verified the facts themselves.
Between 2008 and 2011, I wrote a lot of material for personal development and self-improvement blogs. One popular “fact” in this area is about the “Harvard Goal Study.”
One excellent blogger in the area, though, debunked this in a post Writing Down Your Goals — The Harvard Written Goal Study. Fact or Fiction? This helped open my eyes to the sad truth that some authors make up facts and statistics to suit them, so you do need to look for original studies, government publications, and other reputable sources of information where possible.
If you come across something presented as fact which seems odd or hard to believe, Snopes.com is a great place to turn for an initial check.
Tip 7: Develop a Full Outline
One of the simplest ways to make writing easier is to have a clear outline before you begin. Otherwise, it’s easy to get stuck a couple of chapters into your ebook.
Your outline should include, at the very least:
A title for each chapter. Don’t spend too long agonizing over the exact wording at this stage. It’s usually better to have, say, 15 short chapters instead of five long ones. If your ebook deals with a broad topic, it may also be appropriate to also split it into three to five different parts.
Subheadings or subsections for each chapter, with a list of points detailing information you want to cover. You could produce this as a linear list, or you could create a mind-map to help you come up with new ideas and link them in different ways.
Tip 8: Write Distraction-Free
For most people, writing is a demanding, high-energy task, and it’s often easy to give in to distractions.
Don’t put temptation in your path: create a distraction-free environment by using a program that allows for full-screen writing, like Dark Room,Write Room, or Scrivener. Turn off your phone. Sign out of your email account, Facebook, Twitter, Skype, and anything else that might make sounds or pop alerts up on your screen.
Set yourself up for success by creating an environment that supports your goals.
Tip 9: Prepare to Sell/Market Your Book
Once the writing is done comes the hard part: selling and marketing your book! Check out our list of resources for doing just that:
If you’ve got any tips of your own to share about how to write an ebook, or any questions about the ebook-writing process, just pop a comment below.
This is an updated version of a story that was previously published. We update our posts as often as possible to ensure they’re useful for our readers.
This post contains affiliate links. That means if you purchase through our links, you’re supporting The Write Life — and we thank you for that!
Editor’s Note: This is a guest post by Elle Griffin.
When I finished writing my novel I did the normal thing: I started pitching it to agents. I think I pitched my book to more than 120 agents in hopes that one of them might sell my book to a big publishing house who would make my book a New York Times bestseller and a hit series for HBO.
But as the rejection letters started rolling in, I realized something. Publishing houses make money by adhering to one simple strategy: Spend $5,000-$10,000 on thousands of author advances, and hope that one of them will go on to become a huge bestseller and earn the company enough money to pay for all the rest.
“There’s a saying in publishing: 80 percent of authors fail, and the 20 percent that succeed pay for all the failures,” says Rachel Deahl, news director for Publishers Weekly. “It’s about building up big bestsellers. They are the people who pay for all the people who don’t make it.”
My book is a strange little gothic novel that might appeal to a couple thousand readers, but certainly not millions. Even if a publishing house did take a chance and decide to publish it, I wouldn’t be guaranteed any marketing. And with only 12-15 percent of the sale my best bet was to earn a couple hundred dollars for my efforts.
As Deahl says, “Most books don’t succeed even with a lot of backing. Combine that with no marketing or publicity, chances are your book isn’t going to sell well.”
[sps_reusable_block post_id=43056]
Serial Fiction Is a Better Monetization Strategy Than Traditional Publishing
The New York Times caused a stir recently when, in an article about pandemic book sales, it disclosed that “98 percent of the books that publishers released in 2020 sold fewer than 5,000 copies.”
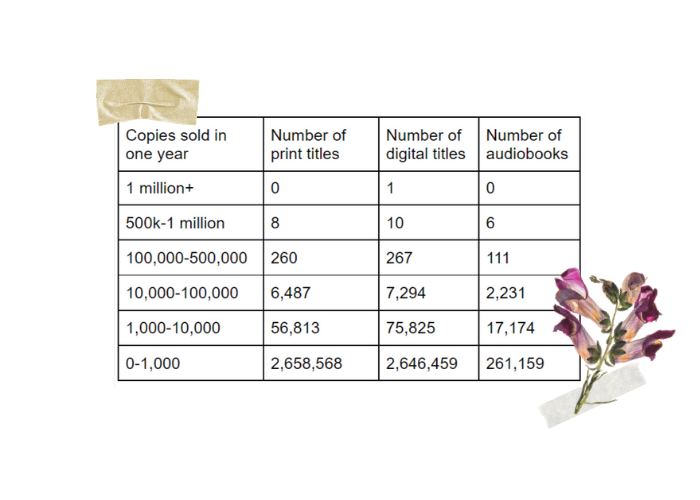
It gets worse. According to Bookstat, which looks at the book publishing market as a whole, there were 2.6 million books sold online in 2020 and only 268 of them sold more than 100,000 copies—that’s only 0.01 percent of books. By far, the more likely outcome is to sell between 0 and 1,000 copies—which is what 96 percent of books did.
And yet, I couldn’t help but wonder if authors could monetize a niche audience. After all, 1,000 readers might not be enough to make it in the big world of publishing contracts and screenplay options, but it could be enough to be profitable—if only creator economy technologies are used.
The “creator economy” is predicated on this very idea. As the going wisdom states: it only takes 1,000 true fans spending $100/year for a creator to earn a salary of $100,000/year. Using our current publishing model, if an author sells 1,000 copies of a book, she will earn $2,250 if published traditionally or $4,200 if self-published. But using the creator economy, an author could release a new chapter every week, charge subscribers $8 or $9 a month, and earn $100,000 a year—from only 1,000 readers.
Non-fiction writers are already doing it. As evidenced by this chart by Alexey Guzey, there are plenty of Substack writers who are putting out quality non-fiction content for their followers and monetizing it—earning in the hundreds of thousands of dollars annually, and in some cases millions, just from reader subscriptions!
But could fiction do the same?
It did once. When Alexandre Dumas debuted The Count of Monte Cristo it was published as a feuilleton—a portion of the weekly newspaper devoted to fiction. From August 1844 to January 1846 his chapters were published in 18 installments for The Journal des Débats, a newspaper that went out to 9,000 to 10,000 paying subscribers in France—and readers were rapt by it.
In the forward to a 2004 translation of the book, the writer Luc Sante wrote: “The effect of the serials, which held vast audiences enthralled . . . is unlike any experience of reading we are likely to have known ourselves, maybe something like that of a particularly gripping television series. Day after day, at breakfast or at work or on the street, people talked of little else.”
It was basically Game of Thrones. Readers could not wait to get their hands on the next chapter and that bode very well for the writer who was not only paid by the newspaper in real-time for his work (by the word), but also grew the popularity of his work over the entirety of the time it was being published.
“The ‘Presse’ pays nearly 300 francs per day for feuilletons to Alexandre Dumas, George Sand, De Balzac, Frederic Soulé, Theophile Gautier, and Jules Sandeau,” Littell’s Little Age, Volume 10 wrote in 1846. “But what will the result be in 1848? That each of these personnages will have made from 32,000 to 64,000 francs per annum for two or three years for writing profitable trash of the color of the foulest mud in Paris?”
That “profitable trash” earned those writers an annual salary of between $202,107 to $404,213 in today’s dollars—and the obvious disdain of that Littell writer who, even then preferred the merits of a bound and published book. The same volume goes on to say that Dumas earned about 10,000 francs ($65,743 today) per installment when he was poached from The Presse by The Constitutionnel in 1845.
Serial Novels are Already Making a Comeback
The serial novel is already making a comeback. On the apps Wattpad and Inkitt, writers can publish chapters as they are written, and followers can read and comment on them in real-time. Wattpad has 90 million users who spend an average of 52 minutes per session reading books online—mostly Millennial and Gen Z. The Inkitt app has 2 million users in the same demographic.
The problem is that authors don’t make money on either platform—readers read for free. There was some hope that would change when Wattpad debuted Paid Stories in 2019, allowing readers to pay for chapters using micropayments—three coins unlock the next chapter—but the author does not get to decide whether or not their content is part of the paid program, the platform does based on how the book performed in its free iteration. And even the best-paid authors aren’t making a living doing it.
Two years into their paid program, Wattpad announced reaching only $1 million in author earnings, split among 550 writers. All things being equal, that’s only $1,818 in total earnings, per author, over a two-year period—and all things are not equal. The more likely scenario is that a small percentage of those 550 made up the bulk of the earnings with pennies left for the rest.
One Wattpad author, who wished to remain anonymous, told me her book reached 20 million free reads on the platform before she was invited to go paid last year. Since then, she has earned a couple million more reads and has averaged $500/month in earnings with her highest month topping out at $1,000. And this is with a YA romance novel—one of the best performing categories on the site.
Now Amazon wants to get in the game. In April of 2021, they announced the launch of Kindle Vella, a Wattpad competitor that allows authors to publish their books serially—and does allow authors to monetize their work. Thus far, no marketing initiatives have endeavored to promote these pioneering authors—but it’s no matter. Writers pour an estimated 1.2-1.4 million books onto Amazon each year and, even if every book sells only 200 copies, the platform will earn 20-50 percent of each sale and win the whole game.
Still, if 20 million people are willing to read a book for free and a couple million more are willing to pay for it, then there is at least a market for serial fiction. The problem is that if authors are only netting $6,000-$12,000 in a year for their work—maybe we don’t have the right platforms yet.
Substack Easily Allows Authors to Monetize Serial Content
I decided to serialize my own novel, releasing one chapter per week from September 2021 through June 2022, and I turned to Substack and Patreon for the experiment. Unlike Wattpad and Inkitt, both platforms allow authors to monetize their work, with readers subscribing directly to their favorite writers.
Publishing on both platforms is free, with Substack and Patreon earning a percentage of income—Substack charges 10 percent of earnings plus a Stripe fee, Patreon charges 5-12 percent of earnings depending on what payment processing services a creator wants access to. And because both platforms allow the author to maintain the rights to their work, there is nothing preventing us from putting our books up on Wattpad, Inkitt, or Kindle after the subscription period ends.
I created accounts on both platforms to test the waters—though each has its share of pros and cons. Patreon, for instance, doesn’t have a free pricing tier which means I would have to build my platform elsewhere before attempting to sell into it. This is why almost all of the 15 authors currently earning more than $4,000/month writing novels on Patreon built their audience on Royal Road, a free serialization platform that lets authors share their chapters as they are written.
“There’s sort of a fixed model for how serialization works in terms of generating revenue—where you start off building an audience on Royal Road and then from there you start a Patreon,” the author Travis Deverell tells me. “And there’s an expectation that your Patreon will have a certain number of advanced chapters ahead of what goes for your Royal Road.”
Deverell’s pen name is Shirtaloon and he earns $28,532 a month from his Patreon supporters. Readers can choose whether they want to read his chapters one week ahead ($1/month), two weeks ahead ($5/month), or four weeks ahead ($10/month) of Royal Road. He also has pricing tiers at $15, $20, and $50 a month which have no additional benefit except supporting an author they love—and fans pay it.
But Royal Road is very genre-specific. In fact, it tends to attract an audience that isn’t well represented elsewhere: hyperniche science fiction and fantasy genres such as litRPG, isekai, and power progression. “Royal Road is such a big platform for building audiences, but the audience is looking for fairly specific stuff at the moment,” Deverell says. “Like Wattpad is great for YA fiction, but Royal Road is a much better fit for what I’m doing.”
Patreon also isn’t well-suited to writing. The author Emilia Rose earns more than $120,000/year serializing erotica on Patreon but plans to move her 3,000 patrons to Litty, a new startup promising to be the “Patreon of fiction” when it launches this fall. “Patreon has set up its website like a blog, which makes the platform incredibly difficult to use for ongoing stories,” Rose says. “Since I release two to five chapters per week of a single story, it is difficult for readers to find previous chapters. From a reader’s perspective, it’s not a great experience.”
Substack, on the other hand, was built for writers. Chapters are delivered via email and books can be separated into “sections,” making the experience easy on the reader. And unlike Patreon, I don’t need to build another platform elsewhere before I can monetize my work. Instead, I can build my audience directly on Substack, writing a free newsletter that upsells into a paid version.
The downside of Substack is that I don’t have access to all the pricing tiers I can get with Patreon—Substack only allows me to have one monthly subscription fee, plus a “lump sum” donation bucket—and I know pricing tiers are a must. After all, why would a reader pay $5/month to read four chapters of a book when they could buy a whole book on Kindle for $1.99? (This is why there are plenty of writers writing novels on Patreon earning $200/month—and plenty of Kindle authors earning $200 total.)
There has to be added value. I want my readers to have the option to join an exclusive online community, be mentioned in the acknowledgments, or even write the foreword for my book. When the book is complete, I want to be able to send autographed, hardcover collector’s edition to premium subscribers, throw a wrap party for my patrons, or even elope to a gothic estate in France to write ghost stories together afterward.
These kinds of value adds are, after all, how the science fiction author N.K. Jemisin achieved Patreon success. She went on to win numerous awards including a Hugo Award and, in 2020, a MacArthur Fellows “genius grant,” but when she first joined Patreon, she simply wanted to make $5,000/month so she could quit her job as a psychologist. She did—and she had five superfans paying $100/month for signed, printed copies of her books and nine paying $50/month for signed-author copies. That’s $950/month in revenue just from her top 14 fans! Authors can’t afford to miss out on that kind of patronage.
Even without pricing tiers, I think Substack is the better bet—the whole process is already built-in and has been proven to work for non-fiction authors. And Substack has made moves to invest in fiction. On June 9th, Business Insider announced that Substack hired Nick Spencer, author of Captain America and The Amazing Spider Man franchises to entice comic-book writers to the platform. They also announced, in August, their first round of investments in comics writers.
Indeed, we may be seeing the beginnings of a surge in fiction writers on the platform. The fiction author Etgar Keret joined the platform in August and the novels Anamnesis and Something Deep are both serializing on Substack. In fact, more authors are putting their novels on the platform every day which makes me wonder whether I should stop looking for where the literary writers are, but where the literary readers are. And we are definitely actively reading (and paying to subscribe to) literary non-fiction on Substack. Maybe we’d read literary fiction there too.
After all, Truman Capote’s novella Breakfast at Tiffany’s was serialized in Esquire before being published by Random House in 1958. The Martian started out as a blog on Andy Weir’s personal website before it was self-published, then traditionally published, then turned into a blockbuster film starring Matt Damon. And in 2020, Lena Dunham serialized her choose-your-own-adventure novel Verified Strangers via Vogue.com.
That’s what Dumas did too. The Count of Monte Cristo was published, not in a literary journal, but in a newspaper—where people were getting their weekly news. Why wouldn’t the sort of people who follow literary journalism and societal critique be the same sort of person who enjoys seeing the Edmond Dantès flee the Chateau d’If via body bag? And Substack is rapidly becoming the newspaper of note for millions of readers.
Of course, to make it on Substack, creators still have to build a platform, publish consistent work to that platform, and attract an audience to that platform, on top of actually writing something good—none of this is easy. But I’m going to run an experiment anyway. With creator economy technologies on the rise and subscription models rapidly proving their viability, I think there’s hope for fiction after all.
I think we’re creating it.
[sps_reusable_block post_id=43056]
Elle Griffin is currently serializing her gothic novel via Substack—and writing a newsletter about it. Subscribe here.
You might have noticed that The Write Life has been on a content break for the last couple months. In mid-June, The Write Life joined the Selfpublishing.com platform of sites and resources dedicated to writing, publishing, freelance, marketing, and more.
The vision for the Selfpublishing.com platform began back in 2015 when Chandler Bolt founded Self-Publishing School, an organization dedicated exclusively to changing the world through the power of books. The company provides education and coaching services to folks who are on the verge of writing or self-publishing a book, but need a little extra help getting across the finish line. Over the years, the vision has only grown (with a goal of helping self-publish over 100,000 books and impacting 120 million lives!), as have the number of resources available to help you do it.
Here at The Write Life, we’ve been ironing out some new content, among other backend systems/process changes, in order to bring you the best possible experience as a reader.
As the new Managing Editor, I want to let you know that I’m fully committed to providing top-notch content centered around helping you become a better writer so that you can achieve your writing goals. I’ll be working with world-class contributors to bring you a steady stream of articles that are guaranteed to both inspire and provide practical tips that can be implemented into your writing routine ASAP.
In the coming months we’ll also be revamping some of our free resources and ebooks, rolling out new trainings, and generally doing everything we can to bring value to The Write Life readers.
If you haven’t already, get signed up for our newsletter in order to get new content, valuable articles from the archives, and those jazzed up resources right to your inbox:
I’m honored to be guiding this ship and I can’t wait to see what lies ahead for The Write Life!
Soooo… you’ve been writing for a while. Maybe you seriously got into writing fiction a year ago; maybe you’ve been a freelance writer for three or four years now. Maybe you started writing a book and it didn’t go anywhere.
You know you want to improve your writing, but you don’t know HOW. What do you need to do to take your writing to the next level? Are there practical, actionable steps you can take to get your writing from GOOD to GREAT?
YES. Writing, like everything else, can benefit from what is called deliberate practice — a focused, disciplined attempt at identifying areas of improvement (and then, of course, improving them).
Here’s how to improve your writing skills — in three (or maybe four) easy steps.
Step 1: Evaluate your work.
Before you can start improving your writing skills, you need to evaluate your work — which means taking an honest assessment of what you’re doing well, what you could do better and which aspects of your writing have stalled at “good enough.”
(Remember, you’ll never get to GREAT if you’re satisfied with GOOD ENOUGH.)
This is the hardest part of the process, because writers aren’t always good at self-evaluation. Sometimes we don’t know where our work can improve, but there are two good ways to find out:
Ask a writer/editor/teacher you trust
Read writing by people you admire, in the genre/beat you’re currently writing in, and do an honest comparison of your work against theirs
If you want to go the first route, there are plenty of ways to connect with other writers and make the kinds of friends who can help you make your work better.
Joining a community like the Freelance Writers Den, for example, can put you in touch with other freelancers and industry professionals — and that’s before you factor in the job boards, writer website reviews, and online bootcamps you’ll be able to access as a Den member.
If you’re more into fiction than freelancing, you could team up with a critique partner or work with a beta reader to learn where your writing is currently working — and where it isn’t.
And don’t forget to read, read, READ. The more you read other writers’ work — especially writers who are doing the same kind of work you’d like to do — the more you’ll understand what it takes to make a piece of writing truly excellent.
Then, you can use what you’ve learned to improve your writing.
Step 2: Identify one area in which to improve your writing.
Going from good to great is an incremental process. Don’t try to change everything you’re doing at once, especially if what you’re doing is already getting you some writing success. If editors are saying yes to your freelance writing pitches, for example, keep pitching. If you just got a short story published, start writing another one.
While you’re continuing the work that’s currently helping you move forward, pick ONE AREA in which to improve your writing skills. Otherwise, your next piece is going to be just as good as your first one — and while that might qualify as “good enough,” it won’t help you take your writing from GOOD to GREAT.
If you don’t know where to begin, go back to that first step and do an honest self-assessment of your writing — or find someone who can help you assess your work and identify one aspect of your writing that could benefit from a little skill-building.
Let’s say, for example, that you have trouble writing an opening sentence. If you want to improve your writing skills, you could set yourself the goal of understanding the difference between GOOD ENOUGH OPENING SENTENCES and GREAT OPENING SENTENCES. Then, you can use that information to get your opening sentences to GREAT.
If you want to improve your writing, this kind of incremental improvement is one of the best ways to get started — but how do you do it?
That’s where Step 3 comes in.
[twl_reusable_block post_id=41455]
Step 3: Begin practicing. Deliberately.
Much has been said about the writing practice, but not enough has been said about the deliberate writing practice.
Deliberate practice is a term created by Anders Ericsson and popularized by Ericsson and Robert Pool in their book Peak: Secrets from the New Science of Expertise. Here’s how they define it:
Deliberate practice involves well-defined, specific goals and often involves improving some aspect of the target performance; it is not aimed at some vague overall improvement. […] Deliberate practice nearly always involves building or modifying previously acquired skills by focusing on particular aspects of those skills and working to improve them specifically; over time this step-by-step improvement will eventually lead to expert performance.
Using step-by-step improvement to build skills and gain expertise sounds like a worthy goal for any writer, but what does deliberate practice look like in practice?
Well — if you were a writer who wanted to focus on improving your opening sentences, you’d use part of your writing practice time to break down the differences between your opening sentences and excellent opening sentences.
What, exactly, is going on with Jane Austen’s famous opening sentence, “It is a truth universally acknowledged, that a single man in possession of a good fortune, must be in want of a wife”? What kind of information is being communicated to the reader, and what does the reader know about what to expect from the rest of Pride and Prejudice?
What about a classic essay like Joan Didion’s Goodbye to All That, which begins “It is easy to see the beginnings of things, and harder to see the ends”? What’s Didion specifically doing with her word choice, with her rhythms, with her parallel structure and use of the repeated “S”?
Then you’ll write opening sentences that do the same things. In your own words, of course. This isn’t about copying Didion or Austen. This is about understanding why those sentences resonate with readers, and learning how to create equally resonant sentences that serve your own purposes and your own voice.
Until you’re no longer guessing at what a good opening sentence should be, because you already know how to write an excellent one.
Step 4: Repeat steps 1–3.
The process of writing well takes a lifetime, but the process of improving one incremental aspect of your craft can go a lot more quickly than you realize. You may only need to devote a week — or even a few days — to opening sentences, and then you might want to move on to dialogue tags.
Or whatever it is you’re hoping to improve in your own writing.
Remember, this kind of work requires you to successfully identify not only what you aren’t currently doing well, but what you’re currently doing JUST WELL ENOUGH — so make sure you’re ready to evaluate and re-evaluate your writing as you continue to improve your writing skills.
This is where a writing accountability team can help, both in terms of ensuring that you’re focusing on areas of improvement and that you’re actually improving your work.
You could also use a tool like ProWritingAid to get an in-depth report of what you do well and what you could do better — and then work your way down the list of suggested improvements, tackling one issue at a time.
Because that kind of deliberate, focused practice is how you take your work from GOOD to GREAT.
Soooo… what tiny, incremental aspect of your craft do you want to address first, and how are you going to use these steps to improve your writing?
Writing is not always a solo act. When you work in the sphere of digital marketing, writers often work closely with designers to bring websites, pamphlets, ebooks and graphics to life.
The most skilled writers within digital marketing must enter every project with design in mind. That means carefully structuring your copy, considering how text will appear beside images and understanding the larger goals of the finished project.
During my career as a freelance copywriter, I’ve received many compliments from designers about how easy my copy is to work with. Often designers are used to seeing walls of text and their job is to translate that text into a structure that looks like a normal website or ebook. If you can fill in a few design gaps as you write, you’ll impress your clients — and get designers to absolutely love working with you because you make their job easier.
In this article, I’ll break down a handful of simple design tricks you can do within Google Docs to structure your copy to impress. Let’s dive in.
Take a step back
Before we dive into the exact tactics, let’s name one of the most common problems starting writers face when learning to write for business.
With the exception of writing blog posts, most things you’ll write for businesses shouldn’t look like a long wall of text by the time you’re done. Before you put your fingers on the keyboard, always look at examples of finished copywriting projects. Pay careful attention to structure. How you structure your copy impacts how you write, so it’s important to understand the general structure you’re aiming for before you get started.
A few examples
Let’s pretend for a moment that you’ve been assigned a website copywriting project. Before you put a single word on the page, go click around your favorite websites. How do they use words on the page?
Likely, your favorite websites aren’t a wall of text. They’re structured with clear, short headlines and minimal body copy.
Consider the simplicity of a website like Intercom.
Your goal as a writer should be to get your copy as close to an appearance of the finished website as possible. That means finding ways to showcase images. It means distinguishing headings from body copy using different size fonts. Could you make your calls to action truly look like buttons — even in Google Docs?
Or perhaps your client has asked you to write an ebook. Ask: How do the most creative, well-designed ebooks appear as a finished project?
Before jumping into the writing, you might scroll several ebooks from HubSpot for inspiration.
Notice that HubSpot’s content isn’t structured as a wall of text with long paragraphs in a single column. The ebook is easy to scroll. It’s visual and colorful. The copy is compartmentalized into small blocks of text.
You can follow that example… and even structure the ebook in Google Docs so that it looks similar to that finished product before the designer sees it.
Writing copy for websites or ebooks means first taking a step back. Decide in your mind that you will write copy in such a way that the designer understands your aesthetic choices the moment they open your Google Doc.
How to structure your copy in Google Docs
You’re probably already using several Google docs hacks for completing freelance writing assignments —from Google docs add-ons to tracking changes in Google docs — now you can make designers fall in love with your work by following these tips for structuring your copy in Google Docs.
Make it clear where images belong
Google Docs makes it easy to add images. The problem is, how you structure those images beside your copy isn’t always ideal. Images can bump your text all over the place, making it hard to show designers what structure you’re going for. Fortunately, there’s a simple workaround that gives you more control over images.
Before dropping any images into my doc, I’ll add a Table and then adjust the dimensions of that table to fit the proportions I’m going for.
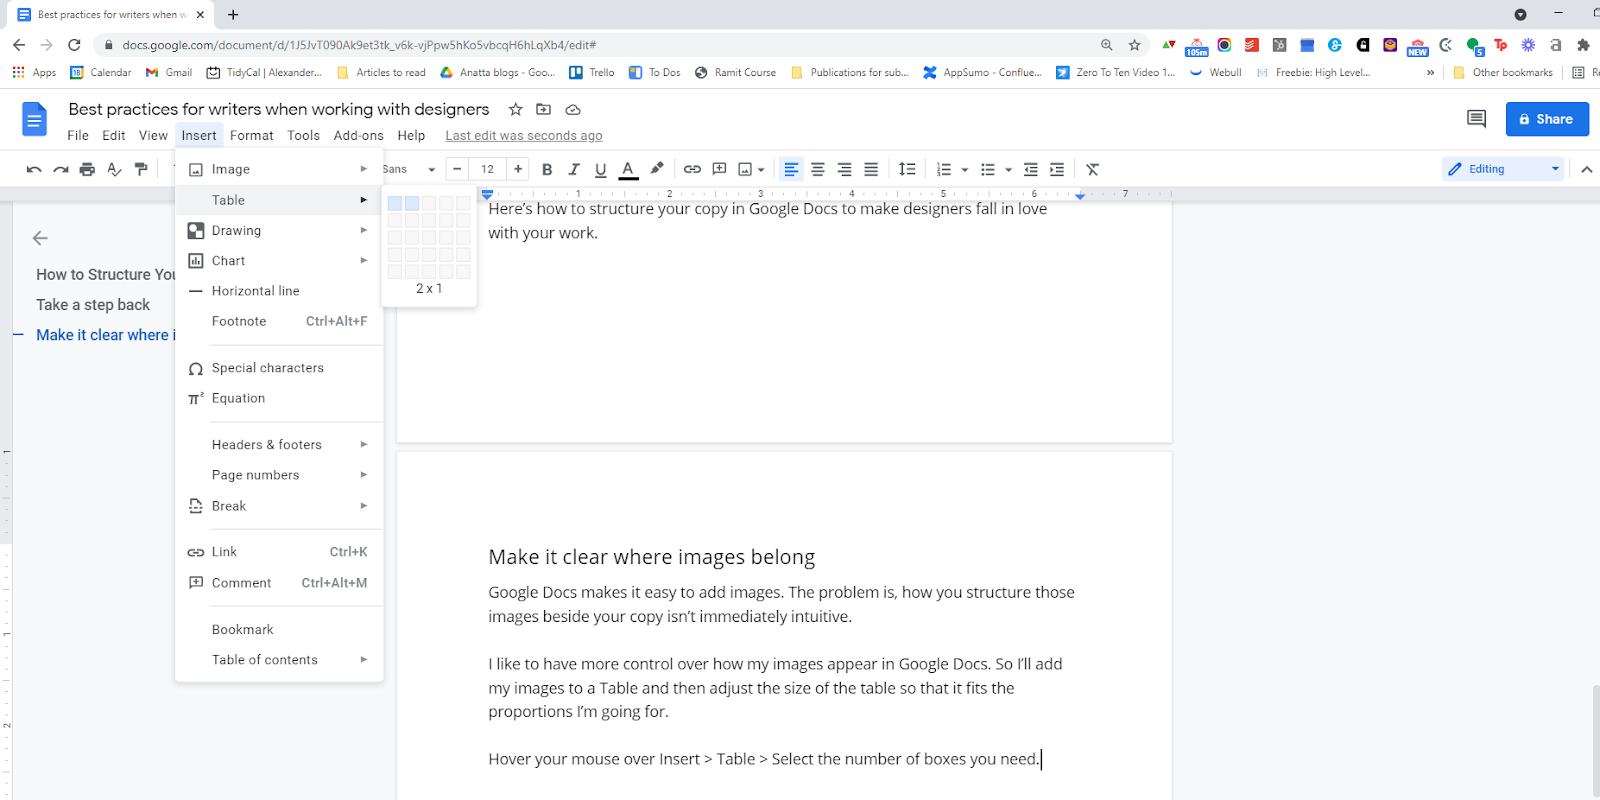
Hover your mouse over Insert > Table > Select the number of boxes you need. (I usually just need two: one side of the table is for copy, the other for my image.)
Once you select the box, you can adjust the click and drag the sides of the table to change its dimensions. Then just add your copy in one box and your image in the other.
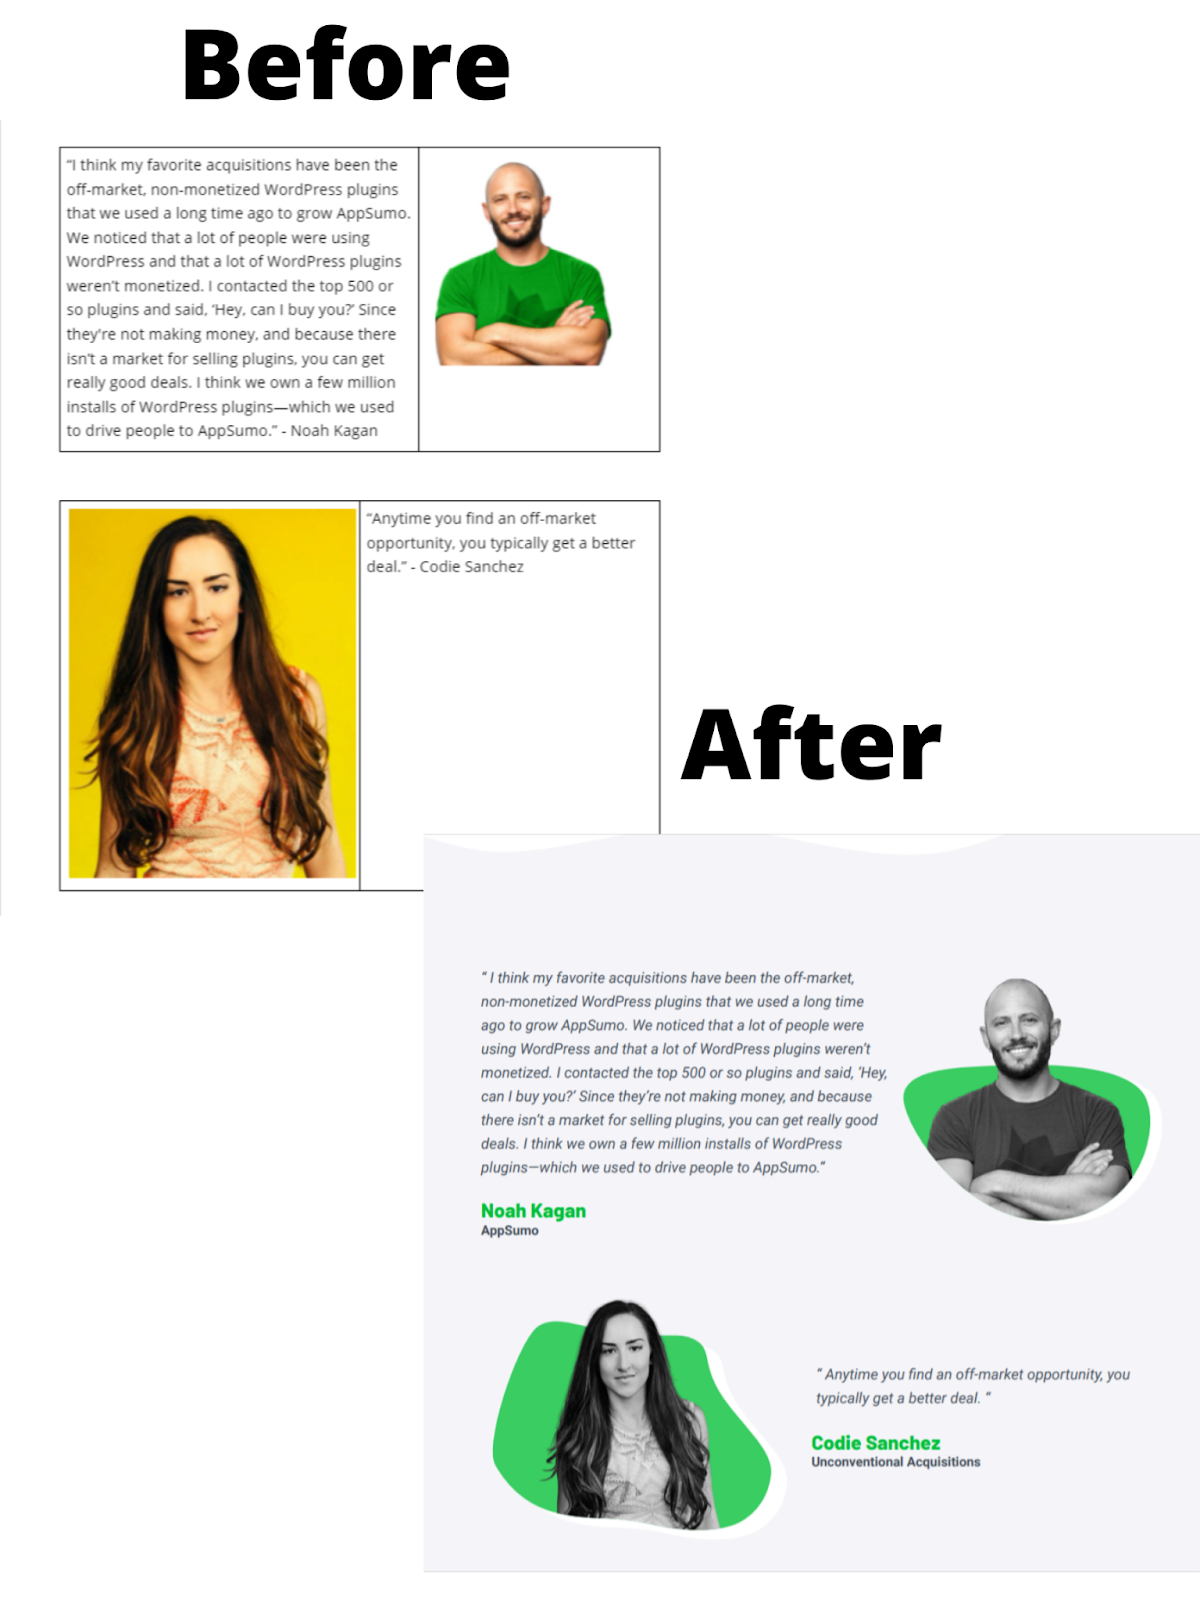
Here’s an example from one of my recent ebook projects. The Before image is how I structured the text in Google Docs. The After image shows what my copy looked like once the designers had a chance to work their magic.
Generate buttons and organize website copy
The Table feature is also powerful for organizing copy for a website. Since the table parameters can be adjusted up, down, left and right, you can use the Table to place copy anywhere on the page. This makes it easy to add elements like buttons or small images without anything pushing your copy out of the way.
Side note: In the example above, my wife included a screenshot from a website that inspired our copywriting and design choices. That’s why there’s a screenshot above the copy. Adding screenshots gives the designers even more insight into how you visualize your copy.
The Table tool in Google Docs will be your best friend. You can also use it to organize copy neatly into columns or place graphics or emojis beside or above text.
And if you want to get rid of the black border, simply: right click the table > Table Properties > Change the border color from black to white. The lines disappear but you still maintain the structure.
Use the Drawing feature
Another helpful tool in Google Docs is the Drawing feature.
Don’t worry, the designer and your client won’t expect you to draft pictures or graphics for them. I use this tool to quickly create photo or graphic placeholders when I really want to convey how a particular space on the page should be used, even when I don’t have all the images I need.
You can access the Drawing tool by clicking: Insert > Drawing > New
With the Drawing tool, you can create bare-bones visuals as placeholders for future designs. I usually just go with a plain X. When seen within the context of my writing, most designers will quickly understand that I expect some image or graphic to fill the space containing my drawing.
In the example below, the designer will easily see that each X should be a headshot that lives above each professional bio.
Show your spacing
Finished websites and ebooks don’t look like a Google Docs. For one thing, the spacing is completely different. As a writer, you need ways to communicate with designers about how large or small a section of copy is meant to be.
For this, I rely on one simple tool.
If I need to show a section is ending, I usually use Google Docs’ horizontal line. You can find it by clicking: Insert > Horizontal line.
A thin black line will appear and divide the page top from bottom. This helps you distinguish when one section ends and the next begins.
My most common use case for this line is to define everything that should be included above the fold on a website. Above the fold is defined as everything a website visitor sees on a website before they begin scrolling.
When writing website copy, everything written above the horizontal line is meant to appear above the fold.
Additional structuring tools and design techniques
There are dozens of additional ways to use Google Docs to convey your design intentions. Not all of them require their own section. Here is a quick list of some additional tools I regularly use to structure my writing.
Use different font sizes to distinguish chapters and subchapters, headings and subheads.
Editable outline (View > Show document outline)
This generates an automatic Table of Contents based on your headings.
Header / footer
When writing white papers, I often insert my client’s logo into the header so that it automatically shows up on every page.
Google fonts
If I know what font my client will use on their website for headings and body copy, I’ll often write using that font or a similar one. Google offers hundreds of free fonts that you can add to Google Docs.
Make designers fall in love with your work
Designers experience many of the same headaches as writers. Their skills are chronically undervalued. Every new assignment is expected to be done yesterday. Designers often must defend their rates and carefully manage scope.
If you can make their life easier by incorporating simple design elements into your copy, designers will remember your work forever. Because copywriters and content writers seldom think twice about structure and design. Designers must interpret a writer’s structure like it’s a new language. When you do the translating for them, you quickly rise to the top of their “favorite writers” list.
Remember: designers and writers often work hand in hand. When designers receive exciting new projects, you want to be the writer they recommend for that next gig. By using good design practices in your writing, you can become the #1 referral of multiple skilled designers.
Differentiate yourself from most of your competition by writing for design. It’s just one more way to add value to every project — and differentiate yourself from most other writers.
After a five-year stint as an employee, I went full-time as a freelance writer in January 2020. I’d been laid off from a short-lived job in December, so I scurried to find work and took any assignments I was offered.
I made enough to make a living in the first few months, but it was well below the salary I’d made as an employee. After two months of scavenging for work — and accepting the reality that I was running a full-time freelance business — I became more choosy about the assignments I’d take on in an effort to boost my income and save my sanity.
In April, I nearly doubled the income I’d made in each of the prior three months.
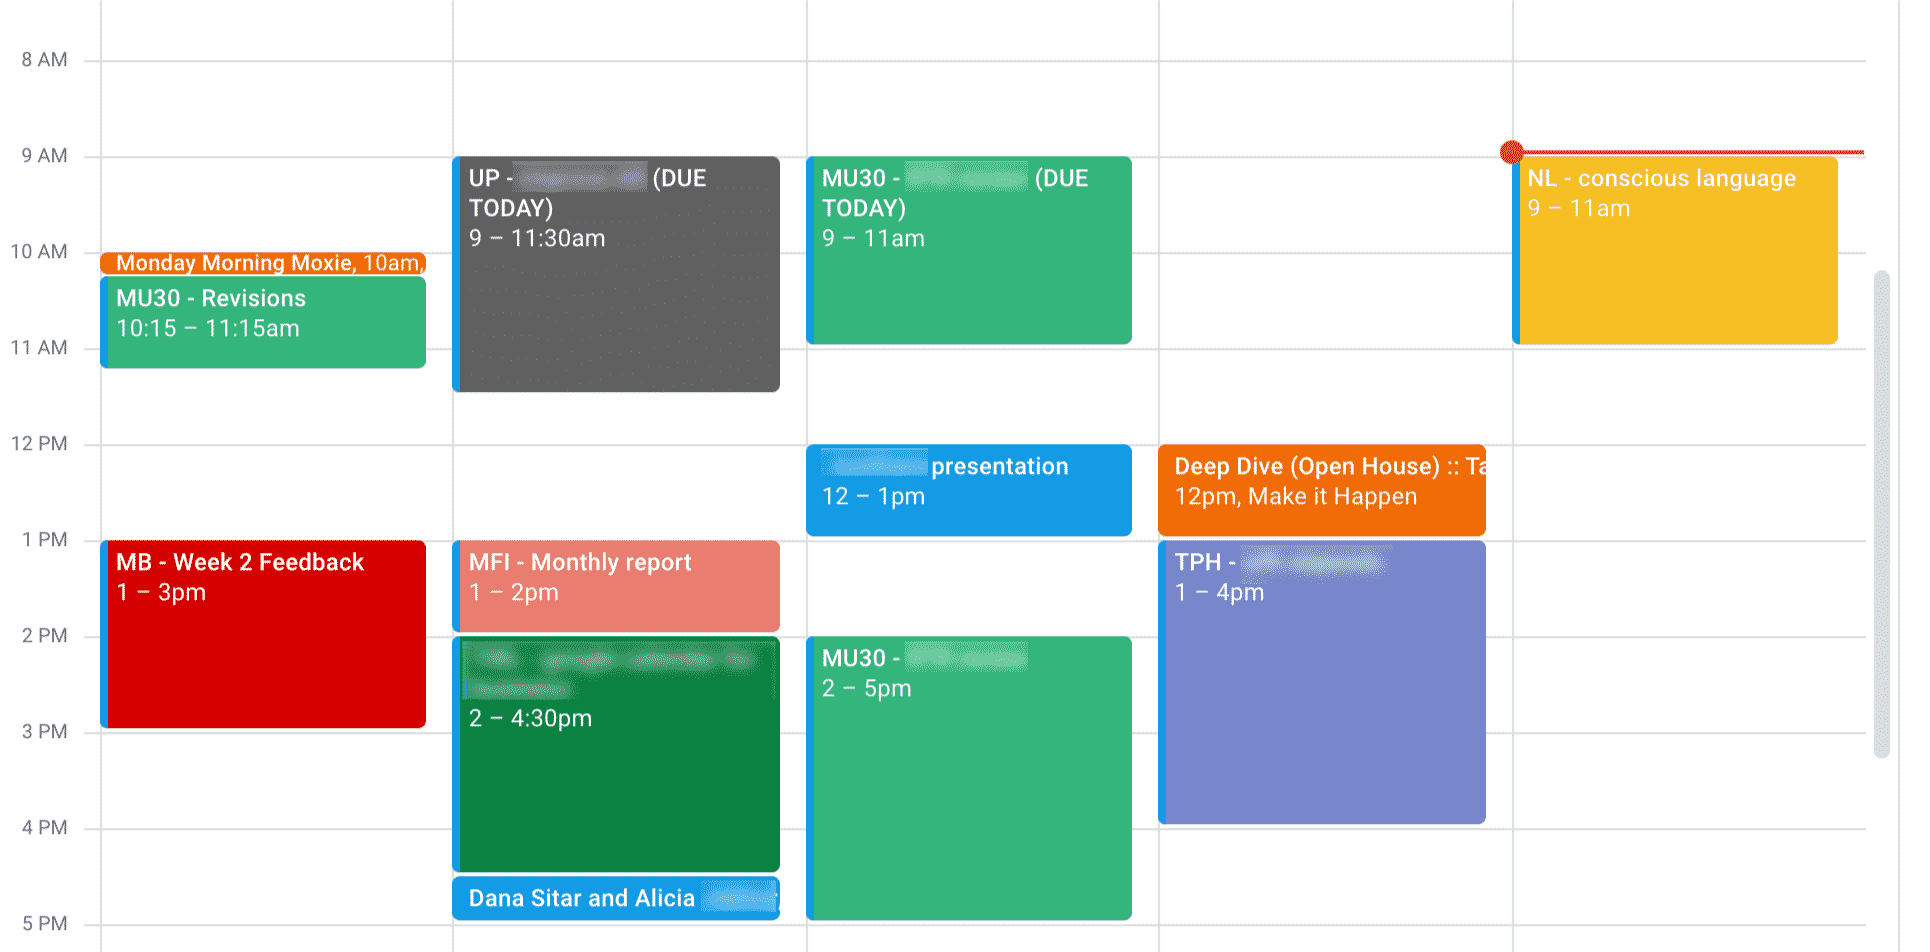
An unexpected Google product became super handy in helping me figure out the best balance of work to create the business I wanted: my Google Calendar.
How I use Google Calendar to optimize my freelance writing business
Here’s how I’ve used time blocking in Google Calendar to quickly increase my freelance income and decrease my stress over the past year and a half.
Block time for each assignment
Instead of just keeping a running to-do list of work, I block time in my calendar for every assignment I accept.
That makes it really easy to see whether I have the bandwidth to take something on when it’s offered. No time in the calendar before the requested deadline? Say no.
Adding assignments to my Google Calendar lets me see my workload alongside scheduled meetings or events, so I avoid accidentally taking on deadlines that clash with a day full of client calls — or over-scheduling client calls during a week full of assignments.
This is important: I don’t put assignments in my calendar based on due dates. I block time based on “to-do” dates.
That means I estimate how many hours it’ll take to complete an assignment (in my case, either writing or editing), and I block that many hours in the calendar ahead of the deadline.
Record actual time to complete work
Regardless of how I’m being paid for an assignment, I keep track of the hours I spend working on it. My Google Calendar time blocks make that easy because I can adjust them if I spend more or less time on something than expected.
Keeping track of my time helps my business in two ways:
I get better at estimating how long it’ll take me to complete work, so I know exactly how much work I can take on each week.
I can quickly see which clients take up the most or least of my time. (🤓 Pro tip: Color code client tasks on the calendar to make this easy to see at a glance!)
Calculate earnings per hour for every client
Because I know how much time I spend on every task, I can figure out how much I’m earning per hour from every client, even the ones that pay by the word or deliverable.
For those that don’t pay an hourly rate, I take the amount I earned for the task and divide by the number of hours I spent on the task.
For example, if I took five hours to write a $250 article, that works out to $50 per hour.
Calculating an hourly rate creates a level way to compare all of my clients, regardless of the kind of work or pay structure.
This is how I figured out — to my surprise — writing is much more lucrative for me as a freelancer than editing.
Prioritize high-yield clients
As an employee in media companies, I’d been working as an editor. After starting as a staff writer, becoming an editor was the natural progression to level up, gain more responsibility and increase my salary.
So I sought editing gigs when I transitioned to freelance work. I was excited when I landed some regular clients, including one gig that promised around 20 hours of work per week — half my roster filled in one fell swoop!
Then I got a few writing assignments.
Because I was accepting everything, I took on some writing clients with pretty low per-word or per-article rates. I figured they’d help fill in around my anchor editing client.
Until I did the math.
Even with low rates, I was earning way more per hour from writing than from my hourly editing clients.
That’s in part because I work quickly, and hourly rates punish efficiency. But it’s also because clients have a skewed bar for hourly rates, often measuring them against what they’d pay an hourly employee.
It’s a lot harder (in my experience) to ask for $50 per hour than to ask for $250 for an article that’ll take five hours to write.
Once I realized this trend, I prioritized finding writing work and dropped my hourly-rate editing gigs one by one — starting with my 20-hour-per-week anchor client.
Dropping that client and the guaranteed work felt like the dumbest move I could make just a couple of months into scrambling to make a living after being laid off. But it paid off. I more than doubled my average hourly rate after that and earned nearly twice the income in Q2 of 2020 that I’d averaged in the first quarter.
One year later, prioritizing around my earnings per hour has helped me double that monthly income again — with average hourly earnings around three to four times what I’d been charging that “anchor” editing client in early 2020.
Schedule work based on income goals
When you’re first starting as a freelancer, setting income goals can be challenging. How do you know what to aim for before you know your potential?
You can set that number in a lot of ways: based on your salary from a previous job, covering your basic expenses, or hitting an arbitrary target that feels like success to you, like earning six figures.
However you decide to do it, I recommend setting income goals, because they’ll guide how you spend your time.
I have a weekly earnings target based on how much I want to earn this year, divided by 48 weeks (leaving four weeks of vacation, sick or mental health days). Combining that target with time blocking my assignments makes it super easy to stay on track — and adjust my workload or client roster when I’m off target.
The method also makes it easy to give myself permission to work on side projects, like my newsletter for writers, without worrying about the unbillable hours.
Here’s how that works: As I block time for assignments in the week to come, I add up my expected earnings for each assignment. Once I have enough assignments on the schedule to hit my target for the week, I stop.
If I only have to work through Wednesday to hit my target? That’s two days free to enjoy a long weekend or make progress on a side project!
If I fill all the work hours in my week and fall short of my earnings target? I have to evaluate and re-balance the assignments I’m taking on from each client to make sure I’m not filling my time with low-rate work.
Why Google Calendar for business?
You can track your hours and block time for work using just about any planner or calendar method you want, on paper or online.
I use Google Calendar because:
It’s what I use to schedule everything else. All of my meetings automatically show up there, so it makes sense to schedule my work in the same place.
I can be “busy” during work blocks. Creating calendar events for my blocked work times lets me show up as “busy” to prevent people from scheduling meetings during those blocks.
I can keep track of all the information I need for an assignment. Google Calendar lets me add notes and live links into an event’s description and attach Google Docs and other assets directly to the event, so it’s easy to use for personal project management.
It comes with notifications. I can set event notifications, so I’ll get a ping when it’s time to move onto the next assignment. If I’m not ready to move on, it’s a good reminder to adjust an event’s time to keep track of my actual time spent.
Using this system has helped me stay on top of my freelance work, even as I’ve added more clients and more irregular work. It’s helped me figure out what kind of work is the best fit for my skills and goals, evaluate the value I get from clients, and optimize my client roster and workload to increase my income and create the kind of business that fits the life I want to live.
Parentheses, like the em dash and ellipses, is a piece of punctuation that’s often overused in writing.
In some instances, parentheses can be useful, but more often than not, they’re unnecessary and may even act as a distraction, weakening your writing.
In this guide to parentheses, we explain what parentheses are, the difference between parentheses and brackets, when to use parentheses and when to avoid them, basic grammatical rules and finally, alternatives to parentheses.
What are parentheses?
When learning the basics of parentheses, I once had a teacher compare them to cupping your hands around your mouth, poised for a whisper. Your hands look like a pair of parentheses.
See: ( )
Parentheses work similarly in grammar. They’re a pair of punctuation marks that enclose or set off information.
Parentheses are not to be confused with brackets, less technically called square parentheses, which are often used when altering quotes. See: [ ]
Brackets are also used when you have parentheses within parentheses, which is more common in technical writing. Here’s an example:
(The results [Figure 4] were inconclusive.)
When to use parentheses
The No. 1 rule you need to remember is to use parentheses sparingly.
AP Stylebook puts it best: “Parentheses are jarring to the reader.” Like a whisper, they can become too distracting.
Even so, there are some instances when parentheses will be necessary. Take a look.
1. Use parentheses to set off (typically nonessential) information
Webster’s New World College Dictionary Rules of Punctuation explains parentheses are used “to enclose material that is explanatory, supplementary, or illustrative.”
Even AP Stylebook, which isn’t particularly fond of parentheses, states, “There are occasions, however, when parentheses are the only effective means of inserting necessary background or reference information.”
One of my former editors (S/O to Heather van der Hoop) advised me to never put information in parentheses unless I felt comfortable deleting it. Her rule reinforced the fact that this information should be nonessential.
Take a look at the sentence above:
One of my former editors (S/O to Heather van der Hoop) advised me to never put information in parentheses unless I felt comfortable deleting it.
The reader doesn’t really need to know my former editor’s name — it’s just explanatory background information — so I set it off with parentheses. I would be comfortable with that information getting deleted, because it wouldn’t change the meaning of the sentence.
Let’s take a look at one more example, but this one highlights the wrong way to use parentheses:
WRONG: The president agreed to sign the new bill into law (even though he’d been adamantly against it last week).
The fact that the president signed a bill that he denounced just one week prior is important, essential information for your story. In that case, you’d want to take this essential information out of parentheses and rewrite it with a comma or em dash.
RIGHT: The president agreed to sign the new bill into law, even though he’d been adamantly against it last week.
If you’re not sure if the information is essential or nonessential, use this rule from Merriam-Webster: “To test if a clause is indeed nonessential, leave it out and reread the sentence. If the main point of the sentence is not lost or distorted, then, yes, it is nonessential…”
One last thing: You can also use parentheses in quotes to add explanatory information the speaker may not have included:
“My opponent (Sam Smith) wouldn’t let up, and I became absolutely exhausted.”
However, if you find yourself using parentheses in quotes often, you’ll be better off paraphrasing.
Her opponent, Sam Smith, wouldn’t give up, and she became exhausted.
2. Use parentheses in specialized cases
This second rule highlighted in Webster’s Rules of Punctuation is straightforward: Use parentheses around numbers or figures in a list within your text.
Here’s an example:
The game was simple: (1) Draw a card, (2) guess higher or lower and (3) set it down.
Note that AP Stylebook tends to prefer bulleted lists if there are more than four items in the list.
When not to use parentheses
Before launching into our grammar overview on parentheses, let’s outline a few common instances when parentheses are often misused if you’re following the AP Stylebook.
Note: These rules will ultimately depend on the publication’s house style, so it’s always worth checking their site!
Abbreviations for organizations: When writing an organization’s full name, you may be tempted to drop the abbreviation in parentheses after the full name, then use the abbreviation throughout the remainder of the article, like such: American Society of News Editors (ASNE).
However, AP Stylebook encourages writers to avoid “alphabet soup” and use the full name of the organization throughout the article, unless it’s a more common abbreviation or universally recognizable.
Phone numbers: You may be tempted to include the area code of a phone number in parentheses, but AP Stylebook wants writers to use dashes.
WRONG: (555) 555-5555
RIGHT: 555-555-5555
Time zones: Parentheses are also not necessary when specifying time zones within the U.S.
WRONG: 5 p.m. (EST)
RIGHT: 5 p.m. EST
You may use parentheses if you’re writing the time outside the continental U.S. The parentheses set off this additional, clarifying (though nonessential) information.
They broke into the art gallery at 9 a.m. (3 a.m. EDT) in Paris.
How to use parentheses
Parentheses are always in pairs, and there are two simple ways we can break down the grammatical rules.
1. Using parentheses around complete sentences
If you’re putting a complete sentence (or independent clause) in parentheses, punctuate as if the parentheses aren’t there. That means including the punctuation inside the parentheses and proceeding as normal.
They both knew he was in the wrong, but he refused to admit it. (At only 19, he still had some growing up to do.)
You could also use a question mark or exclamation mark if appropriate.
2. Using parentheses around incomplete sentences
If you’re putting an incomplete sentence (or dependent clause) in parentheses, punctuation goes outside the parentheses, and you don’t capitalize the first word.
The above sentence is an example of an incomplete sentence in parentheses, but here’s another example (in case you need it).
If you wanted to add an exclamation mark or question mark within the parenthetical, you can. It’d look like this:
The above sentence is an example of an incomplete sentence in parentheses, but here’s another example (in case you need it!).
Like any punctuation, there are also more intricate rules to consider. For instance, according to Webster’s Rules of Punctuation, when a complete declarative sentence within parentheses is part of another sentence, no period is required. Here’s an example of what that’d look like:
Her 94-year-old grandmother (recall she was born in 1927) was an iPad wiz.
You won’t end an incomplete sentence within parentheses with a comma, semicolon, colon or period.
WRONG:I somehow lost my suitcase (lime green, hot pink and orange,) but the woman who sat next to me on the plane helped me find it.
But you can add a comma, semicolon, colon or period, right after the closing parentheses.
RIGHT: I somehow lost my suitcase (lime green, hot pink and orange), but the woman who sat next to me on the plane helped me find it.
Alternatives to parentheses
Now that you’re armed with this information, we must remind you: Use parentheses sparingly!
“The temptation to use parentheses is a clue that a sentence is becoming contorted,” explains AP Stylebook. “Try to write it another way. If a sentence must contain incidental material, then commas or two dashes are frequently more effective.”
These two easy alternatives that usually work just fine:
Em dashes
Commas
If you find you have a bad habit of using parentheses as a writing crutch, a grammar checker tool like ProWritingAid will suggest ways to strengthen your writing.
So, sure, sometimes parentheses are necessary — if they are, you’ll now know how to use them correctly — but more often than not, you can go without and make your writing even stronger and more clear with a simple tweak.
This post contains affiliate links. That means if you purchase through our links, you’re supporting The Write Life — and we thank you for that!
Have you ever been afraid of editors thinking you haven’t proofread your piece, even when you definitely have?
Do you re-read your posts ad nauseam, only to still feel a sense of dread when sending your draft?
Yeah, proofreading isn’t fun.
Writing comes with a creative payoff.Editing gives you an authority edge. But proofreading? It’s tedious, boring and never feels like you’re doing it right.
The problem with proofreading is that we seldom look past grammar and spelling. And that’s what most tips for proofreading seem to focus on, but the reality is there’s so much more to it.
Sure, we read through guidelines and try to follow certain styles, but that’s about it. In fact, on a surface level, those do sound like the only things you could do.
Otherwise, you’d just be aimlessly rewriting, no?
Well, what if I told you there’s another level — or five — to proofreading?
This might sound like we’re entering editing territory, but I promise you we aren’t. This deeper proofreading is still an incredibly contained system, meaning you won’t feel tempted to rewrite everything (as often happens when you edit your own work).
Quick and Easy Proofreading Tips to Improve Your Writing
These 5 proofreading tips are genuinely quick and painless, but the payoff will be massive.
1.Hidden spelling and grammar mistakes
While we’re all fond of squiggly lines in grammar checkers (ProWritingAid is our favorite on The Write Life), it doesn’t mean they are necessarily 100% accurate, nor are they the be-all and end-all.
Word processors and proofreading tools can miss language nuances, like a mix-up between “where” and “were” or “in” and “on.”
Catching these blunders is easier when you’re actively on the lookout for them.
Some proofreading tips say to read a postbackwards. Others suggest reading the piece out loud (preferably the next day). Both are great moves. I’d also add running your post through multiple processors — maybe Word and Google Docs, for example. You could potentially use multiple proofreading tools like ProWritingAid and Grammarly to take this a step further.
In my experience, one tool will often pick up what the other might have missed.
2.Unintended repetition
Repetitive adjectives, adverbs, and even verbs are a commonly overlooked factor for writers.
This phenomenon isn’t as pervasive when the piece is short, and you’re writing it in one sitting. However, when you’re writing long-form or returning to a piece you started working on hours or days prior, you often forget your pre-existing arsenal of words.
You can start by using the “find” feature on Word or Google Docs (Command+F/Ctrl+F) to see how many times you’ve used a specific phrase.
The reader can tell when you use the same adjective. It makes them stop and question if they’re re-reading the same line or if you accidentally duplicated a paragraph. Your reader’s undivided attention could be just a synonym away.
3.Loss of voice
You know how they say reading is the best writing teacher (or something along those lines)?
I’m not saying you’ve been lied to, but I am saying that sometimes your favorite writer — or a motivating post — can creep their way into your writing. Inspiration can turn into mimicking, so make sure your writing retains its unique flow.
If you want a sort of measuring stick for loss of voice, try reading out loud a line from the beginning and a line from the end. Do they sound like they were written by the same person (you)?
If they do, compare to a line from the middle.
If they don’t match, don’t panic. All you have to do is re-read from start to finish. Trust me, you’ll be able to tell where it all went wrong.
[twl_reusable_block post_id=41455]
4.Generic lines
A similar issue is relying on conventions of the genre. Be it a sci-fi novel, a post for a yoga blog or a poem for your lover: don’t fall prey to the siren’s call of clichés.
Not sure what I’m talking about?
Generic lines sound like everything you’ve ever read before. They usually contain buzz words and try to incorporate a lot of jargon. The problem is: they aren’t genuine, and usually don’t say a whole lot.
Nine times out of 10, all you have to do is pluck out these filler sentences. Removing them will not only alleviate your writing from the perils of inauthenticity, but will also make the finished product cleaner and more concise.
5.Run-on arguments
Nothing kills like overkill.
Every topic has a built-in stretch meter (AKA how long you can rant about it before running out of things to say). One of the most important tips for proofreading is to double-check that you haven’t exceeded the mark.
Do your final paragraphs sound pretty much the same? Consolidate them into one.
You can also avoid rambling by assigning a specific detail or argument to each of your paragraphs. If you limit each sentence to their unique purpose, it’ll become that much harder for an idea to appear more than once.
Take Your Writing to the Next Level
Will these proofreading tips make the process more fun? Not necessarily, but they will certainly give you a better command of your writing.
Although it’s unavoidable to miss a spot here and there, these tips will ensure you’re handing in your best work at all times.
Here’s to dreading the “submit” button a little less!
This is an updated version of a story that was previously published. We update our posts as often as possible to ensure they’re useful for our readers.
Even if you don’t know the first thing about SEO writing, you’ve likely heard the buzz.
SEO is a great (and free!) way to get traffic to your website or blog. It’s also a great skill to have as a freelance writer working for other clients, as it can help you provide additional expertise which means additional dollars in your pocket.
But from the outside looking in, it all can feel absolutely intimidating.
Don’t worry — this guide will break it all down for you in an easy-to-understand way.
So what is SEO writing, and why is it time to get on board? And how do you even write an SEO post? I’ll start with the basics.
What is SEO Writing?
SEO stands for search engine optimization. SEO writing is the practice of creating content that ranks on Google. (Of course, there are other search engines, but Google is the biggest player these days.)
Here’s the easiest way to think about it: Take a second to Google a term or phrase. Let’s go with “how to write an ebook.” The first few results that pop up are probably paid ads. Skip those, and you’ll start seeing various websites that cover the topic. (You might even spot The Write Life!)
The sites you’re seeing have mastered SEO writing. They’ve made it to the first page of Google. That’s your goal.
So why is page one of Google such a coveted spot? When your content ranks high, it gets more traffic.
The readers visiting your content are also coming in with high intent. They’ve just searched the specific topic of your article, so you’ve got a better chance of influencing them — whether you want them to click a specific link, download an ebook or subscribe to a newsletter or online course.
Ranking on Google is also a great way to boost your brand awareness and establish yourself as an authoritative figure in your niche. Basically, it’s free advertising.
An SEO writing mini-dictionary: The terms you need to know
Want to give this whole SEO thing a shot?
I won’t sugarcoat it: The world of SEO is pretty technical, and there’s a whole dictionary worth of terms and acronyms out there. I’ve been doing SEO writing for about four years now, and I think these are the three most important terms to keep in your back pocket when starting out (no need to overwhelm yourself).
Keyword
The keyword is the word or phrase you’re trying to rank for. This is what people are typing into the Google search bar. “How to start an ebook” is an example of a keyword.
Volume
Search volume refers to the number of searches a keyword gets per month. For instance, at the time of writing this, the keyword “how to write an ebook” had a volume of 2,400, according to Ubersuggest. (More on how to find this info in a minute!)
That means approximately 2,400 people have searched this term in the past month. The higher the volume, the more potential there is for traffic; however, you’ll want to keep the keyword difficulty in mind…
Keyword difficulty
The keyword difficulty (KD) is a number between zero and 100 that indicates how difficult it’ll be to rank on Google. If a keyword has a high KD, that means there’s a flood of content around the term, so you’ve got a lot of competition. It’ll be more difficult to climb the ranks.
As a general rule of thumb, you have a better chance of ranking with a lower KD.
Going back to our “how to write an ebook” example, its KD is currently 21, which means your content should have a decent chance of ranking if you’ve optimized it. If the KD were 50 or higher, it’d be more difficult.
How to choose your keyword (let Google help!)
Now that you’ve got the lingo down, it’s time to start researching keywords for your SEO article. You’ll want to choose this keyword before you write your content. Everyone’s process looks a little different, but I’ll show you how I do it.
Let’s say I want to write an article about growing lavender. I’ll brainstorm a list of terms and phrases around the topic. I think about what I would search as someone who’s looking to grow lavender. Here’s an example of what this list might look like:
Growing lavender
How to grow lavender
Lavender plant
Lavender garden
To add to your list, let Google help you out. Open a new browser window and start typing your keyword. When I type “growing lavender,” several suggested searches pop up, including “growing lavender from seed” and “growing lavender indoors.” These might be good article ideas.
You can also take a look at the “People also ask,” “People also search for” and related searches sections on the first page.
Once I’ve got my list, I’ll collect the volume and keyword difficulty of each term. If you’re just starting out, Ubersuggest is a great tool for this.
Choose one or two of your keywords, and check out the volume and keyword difficulty. (Ubersuggest calls this the SEO difficulty, or SD.)
The sweet spot is finding a keyword that has a high search volume and low difficulty.
That means a lot of people are searching the term, but there won’t be a ton of competition, so you have a better chance of getting up to page one.
I also love the “keyword ideas” section on Ubersuggest. These are just aggregated related terms you might not have thought about.
With my “growing lavender” example, I decided to write for the keyword “growing lavender indoors.” Although there’s a lot of search volume around “lavender plant” and “growing lavender,” I choose the indoors angle because it still has a robust search volume of 2,000, but its keyword difficulty is super low — at an eight. It’s also specific enough that it really caters to that reader searching with a high intent.
A brief note on SEO tools
There are so many SEO tools out there, but as you continue to explore the world of SEO, you’ll find your favorite.
Ubersuggest is great for beginners, but the free version limits you to the number of keywords you can search in a 24-hour period, so choose the keywords wisely! If you want to subscribe, individual accounts start at $29 a month.
If you want to test out a few other tools before you make a commitment, Wordstream is also a great resource, and it comes with a free trial. My personal favorite is Ahrefs, which has a seven-day trial for $7 if you want to take a look. (Editor’s note: We use Ahrefs here at The Write Life.)
5 SEO writing tips for strong content that ranks
Once you’ve got your high-volume, low-difficulty keyword, it’s time to start creating your content.
Full disclosure here: There’s never any guarantee what you create will rank. There are complicated Google algorithms working behind the scenes that ultimately make this call, and lots of other factors go into rankings that we don’t cover here, for example, website speed.
However, there are some best practices for you can implement so you can create the best piece of SEO content possible. These are called on-page SEO optimizations, because they’re changes you can make in the content right on the page.
Here’s what makes for strong SEO writing.
1. Study Google
Outside of your keyword research tools, Google is going to be your No. 1 resource for SEO writing.
With your keyword in hand, open an incognito window (so your previous search history doesn’t taint your results) and search your keyword. Take a look at the results. You’ll want to focus on five key features on this page:
The featured snippet: This is the box that appears at the top of your search. Typically, it includes a headline and a numbered list. With our “how to grow lavender indoors” example, the snippet features a list of tips.
People also ask: Right below the snippet you’ll find this section. These are related questions people have searched. It looks like folks are curious about “How long does it take to grow lavender indoors?” and “How do you care for an indoor lavender plant?” These are questions you’ll want to answer in your article.
The top three to five results: Because we know Google likes these articles (they’re on the mystical page one, after all), take some time to read the articles and consider their contents and organization. This will help you better understand readers’ search intent.
People also search and related searches: You’ll find both of these sections at the bottom of the page. These can also help inform what goes into your article. For instance, I might want to include information about “how to grow lavender from seeds” and “benefits of growing lavender indoors.”
I like to take notes on all this information and throw it in a document.
2. Make an outline
Armed with your intel, it’s time to make an outline. Typically, I despise outlining articles, but this is an essential step in SEO land.
In your outline, you’ll want to include the recurring themes, elements and keywords you collected from studying page one. I like to take pieces from each Google element and each top-ranking article and create my own rendition.
While you’re doing this, keep the reader in mind. If you were searching for “how to grow lavender indoors,” what would you want to read about? I leave little notes to myself where I want to address commonly asked questions, related search terms or specific keywords.
To really create the best content, go above and beyond. See if you can pinpoint a missing theme, section or element the other top-ranking articles didn’t cover. For instance, I notice none of the top-ranking articles for growing lavender indoors include ways to harvest and use your lavender (for oil, baking, tea, etc.), so I could include an ideas section at the bottom of my article.
3. Ask the experts
One of the reasons I love working with SEO content is because Google values page quality. It’s looking for content with legitimate information from legitimate sources.
In fact, there’s a popular acronym in the SEO community: EAT. It stands for expertise, authoritativeness and trustworthiness. Keep this in mind as you write.
To beef up your SEO article, reach out to an industry expert for an interview. You might also cite credible sources or databases. Adding external links (these are the hyperlinks to other websites) can also help.
4. Use your keywords wisely
There’s a popular phrase out there called “keyword stuffing.” It basically means a piece of content is unnaturally stuffed with keywords; the sentence structure is awkward, and all grammatical rules have gone out the window. Yikes.
You want to avoid keyword stuffing at all costs. Even if “growing lavender in apartment” is a related search, I wouldn’t add it to my content as such — that’s robot speak. It’d be OK to write about “growing lavender in an apartment.”
Write as naturally as possible, and don’t stretch to fit specific keywords or phrases into your content just because Google seems to like them. Keep to your craft, and write in a way that’s clear and concise.
On that note, there are some important places you’ll want to incorporate your primary keyword. (But avoid using it too much, see: keyword stuffing.) Places you’ll want to use it include:
The headline: Like always, you’ll want your headline to be enticing, but you’ll also want to incorporate the keyword you chose. For example, “Your Guide to Growing Lavender Indoors (Even If You Don’t Get a Ton of Natural Light)” could be a catchy headline.
The excerpt/description: When you upload your article to your website, write a strong excerpt that features your keyword. It never hurts to spark a little curiosity.
The URL: It’s important to include your keyword in your URL.
The article: You want to let Google know you’re actually writing about the topic at hand, so try to incorporate the keyword into your introduction and in a subhead, if you can.
The featured image description: Google doesn’t just focus on the text — it also looks at the images. Write an image caption and description that includes your keyword, so Google knows it’s relevant.
Above all, always keep the reader in mind. Generally, if you can make them happy, Google will take notice.
5. Don’t overthink it
My biggest piece of advice is don’t overthink this! Don’t worry about hitting a specific word count or implementing any SEO “hacks.” As long as you create a strong outline and write with the reader in mind — meeting their expectation and serving their needs — then you’re doing exactly what you need.
What’s next? Mastering the art of SEO writing
Remember: SEO writing is more of an art than a science. There’s no specific tried-and-true formula, so this will take some tinkering and experimenting on your end.
As you continue to dive into the world of SEO, here are my suggestions:
Keep studying: Like I said, the SEO world is ever-changing; Google is constantly updating and putting out new releases. Stay tuned by following some of the top experts and publications. The Freelance Writers Den actually has a great bootcamp that goes super in-depth into SEO writing. It’s definitely worth checking out in their course library. Additionally, check out Neil Patel, SEMrush, and Yoast for more great info. There are also plenty of podcasts, ebooks, Facebook groups, and online courses on SEO if you want to take a deeper dive.
Track your SEO performance: Once you’ve published your content, you don’t have to continuously search the keyword to see if you’re ranking. Instead, tap into your SEO toolbox. Head over to Ubersuggest (again, one of many options), and enter your website’s URL. There, you can track your search traffic, your top SEO posts and your top-ranking keywords. Keep tabs on this as you experiment.
Optimize: If after a few weeks your article just isn’t doing much, it might be time to optimize it. Conduct an “audit” for your target keyword, and see what else you can do to beef up your content. If some of the top posts include a comparison table, for example, consider creating your own.
Honestly, many people struggle with SEO writing because, well, they don’t know how to write. You’ve already got that down, so now it’s time to show Google what you can do.
Want to give SEO writing a try? What’s the first topic you want to cover? Let us know in the comments below!
This is an updated version of a story that was previously published. We update our posts as often as possible to ensure they’re useful for our readers.
You’re not someone who cares about tradition in your fiction, are you?
You’re willing to explore. You’re striving for meaning, and you want interesting experiences.
Well, that’s the second-person point of view (POV) for you: nontraditional, explorative, meaningful and interesting.
It also sounds a bit like an ad for an exaggerated travel agent or a self-help book, doesn’t it? There’s a reason for that, and we’ll get to it later. But first, I have a little riddle for you…
Is this blog post written in the second-person point of view?
By now, you know I use the word “you” quite a lot. In fact, many bloggers address their readers personally as “you.” Does it make our writing fit the second-person POV?
As you may have guessed, the answer is no.
True, I’m addressing you as the audience. But there’s still a protagonist to this story, and it’s me, in the first person. I’m the person behind this post.
What is second-person point of view?
Let’s start with a second-person point of view definition.
In fiction, pure second-person POV uses the perspective of a single character, the protagonist, to tell the story. This character is well-defined, with habits, traits and a unique personality. The reader is simply placed “behind” this character, seeing and experiencing the world through his eyes, body and mind.
Need a second person example? It sounds like this:
Eventually you ascend the stairs to the street. You think of Plato’s pilgrims climbing out of the cave, from the shadow world of appearances toward things as they really are, and you wonder if it is possible to change in this life.
— Jay McInerney, “Bright Lights, Big City”
As you can see, there is no “I” in this second person example. There might be a “he” or “him,” whenever the protagonist is interacting with someone, but your principal pronouns are “you,” “your” and “yours.”
For that reason, it’s a bit hard to create a variety of sentence structure in this POV. Starting every sentence with “you” can quickly grow old.
If you try using the second-person POV, watch out for this issue. You can alternate pronouns by writing about items and other characters in your protagonist’s environment. For example, here’s an excerpt from from Italo Calvino’s “If on a Winter’s Night a Traveler:”
Adjust the light so you won’t strain your eyes. Do it now, because once you’re absorbed in reading there will be no budging you. Make sure the page isn’t in shadow, a clotting of black letters on a gray background, uniform as a pack of mice…
The good and evil of writing in second person
The second-person POV casts the reader as the protagonist. That means she’s “forced” to act and think in ways that might not be authentic for her.
If you, as the writer, pull it off, this POV creates instant, complete empathy between the reader and the protagonist. It makes every thought and action her own and evokes emotional responses from her gut.
If you aren’t successful, though, reading in this POV can be a highly annoying experience for your audience.
Writing in the second person means treading a fine line. When you write in this POV, you’re very clearly attempting to manipulate the reader’s thoughts and emotions. Not all readers will take well to this strategy.
But that’s OK! All good writing manipulates a reader’s emotions; consider how we connect with characters like Holden Caulfield and Harry Potter. After watching the world through their eyes in third-person limited POV, no one can resist feeling for them — even though Holden is a fairly unlikeable character. That intimacy is emotional manipulation at its literary best.
The challenge of the second-person point of view is to manipulate your reader’s thoughts and impressions without forcing feeling and emotion where it doesn’t belong. You want it to feel natural, not kick your reader out of the story by trying too hard.
How do you master this balancing act? By reading great examples of the second-person point of view, testing it in your own writing and sharing your work with others for feedback and advice. A writing accountability partner or group will be invaluable in exploring this POV.
When should you choose the second-person POV?
There isn’t any perfect genre or type of work for a second-person POV story, though author Rebecca Demarest suggests that this perspective works best in short stories or “scattered chapters” of a longer manuscript.
This POV seems to work particularly well when an author is reflecting the Zeitgeist. By speaking in the second person, the author can hold a mirror to society, revealing emotions, actions and particular nuances of the times.
A prime example of this use is “Half Asleep in Frog Pajamas” by Tom Robbins. He captures the crash of an American dream and the economic wavering of the early 90s:
As far as you are concerned, the real fun stopped back in the eighties. Before your time. In those days, somebody in your position could earn major money. Jumbo money. You read about it, dreamed about it, all through college. How typical of your luck that when you finally arrived in a position to poach your golden eggs, the goose had a hysterectomy.
The majority of audiences can relate to these timely themes, so they’re a good bet for an exploration of character, society and empathy.
Other popular places to use the second-person point of view are poetry, interactive fiction and choose-your-own-adventure stories.
Will you try writing in second person?
Give the second-person POV a try. See what playing with this perspective can do for your writing, whether it’s in a new story or by tweaking the point of view in a story you’ve already written.
It won’t be a fit for every writer or for every story, but you just might find you enjoy writing in the second person.
This is an updated version of a story that was previously published. We update our posts as often as possible to ensure they’re useful for our readers.